Definition
A Datatool is a containerized python based utility, which extracts data from a given source dataset, translates both unstructured (images, audio, video files etc.) and semi-structured (CSV, JSON, TXT, XML, XLS, etc.) data to common representation. It also enables loading the translated data into python based data structures using a standard API.
By performing this ETL (Extract, Transform and Load) step, the datatool generates a standard data structure and definitions for the annotations, which are then consumed by the data scientists/AI Talents and analysts for various purposes like data analysis, predictive modelling etc.
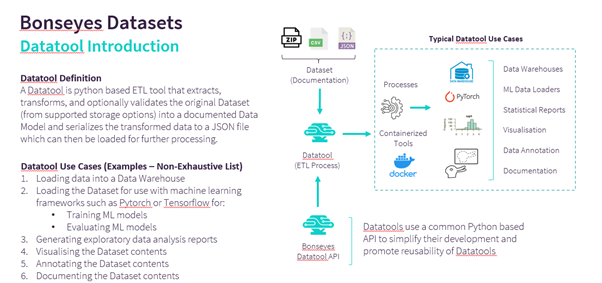
The purpose of this document is to guide the developers in the creation of new datatools through a step-by-step process with examples. This document provides the necessary details and guidelines which need to be followed for efficient and correct development of datatools.
Scope
A core value for AI Talents is the ability to figure out a machine learning algorithm that solves a task. In reality, model training is just the final stage of a large body of work, mainly dealing with the management of data, that is required just to start building a model. Before AI Applications can be trained using highly sophisticated neural networks, an entire data infrastructure should be already in place, tested and ready. Unfortunately, there is an enormous work needed in the upstream part of the whole data pipeline, which is often taken for granted.
Within this data pipeline, one of the biggest challenges dealing with any amount of data is the number data sources/channels producing that data. Multiple data sources give rise to multiple naming conventions, annotation specifications and data structures and make it almost impossible to re-use the same set of tools to consume data coming from different sources.
Datatools aim to bring a uniformity across different datasets by extracting, translating, and loading using common APIs and definitions. By doing this, Datatools enable re-usability and standardization of any tooling aiming to consume multiple datasets for a solving an AI challenge.
In addition, Datatools provide an interface for tracking different versions of the same dataset as well as means for reproducing any data transformations by introducing the concept of versions and tags.
Data Traceability with Versioning and Tagging
A Datatool defines versions, which are strictly associated to a version of the source dataset. For example, if a dataset has two releases (R1 and R2), the datatool can have multiple versions (V1 and V2) defined such that version V1 takes release R1 as input and translates it and V2 takes release R2 and perform the translation.
While datatool versioning covers the versioning aspect of the source datasets, the reproducibility aspect is covered by the tagging mechanism inside datatools. A datatool defines tags for two reasons:
When a dataset comes with multiple sets of samples having the same annotations (Physical Tags): One example for it could be famous IMDB WIKI dataset where the annotations are provided for age and gender for two sets of images. One set has the full body while the other set has the cropped images containing only the face region. By defining two tags (T1 and T2) datatool enables the user to choose which set of images they want to process and use for translation.
For reproducibility of transformative operations (Logical Tags) Sometimes it is desirable to create different artifacts while translating the data. One example could be a dataset for facial landmarks along with the images. In one case, it may be required that datatool generates affined images which are all aligned with eye centers and nose while in another case, cropped images containing the face region might be needed.
To cater for such cases, datatool can define two tags where first tag T1 generates affined tiles in output upon running the datatool while the second tag T2 generates the cropped images by applying some heuristics to generate the bounding box from landmarks and crop the face region.
Datatool Output
A Datatool generates a directory for each processed tag containing the following:
sample_files: Directory containing the samples (images, videos, audios).
dataset.json: JSON file containing the annotations in the standard format and structure for all samples present in samples directory.
dataset_sample.json: JSON file containing the annotations in the standard format and structure for only one sample present in samples directory. This is useful to inspect the JSON as sometimes it is difficult to open the full json due to its sheer size.
Post Data-tooling Benefits
Once a dataset has been translated to the common standard structure using the datatool, it can benefit from the following tools:
Traceability through Versioning and Tagging: Datatools introduce versions for developers to manage multiple releases of the source dataset. Physical Tags in datatools allow to have data partitioning and with the help of Logical Tags reproducibility for the performed operations and generated datatool output can be ensured.
Datatool API: A python-based API serving as the abstraction layer on top of datatool output. By using the API, the dataset can be loaded, annotations can be read and changed through python-based objects. In addition, the API also performs validation on all the annotations present in the dataset while also letting the user to handle very large amount of data by providing different operation modes (memory, disk, ramdisk) for data handling.
Exploratory Data Analysis (EDA) Tool: A containerized python based tool that allows the user to load the datatool output and generate an EDA report. The report can provide statistical insights on the annotation distribution in the dataset and their interactions with each other, which is very beneficial for understanding the dataset and making decisions for its usage.
The remainder of this documentation explains how to create a new datatool, based on the Bonseyes template, and how to implement it.
Pre-requisites
Before starting the development for datatools, following requirements must be fulfilled by the developers:
Access to the Source Dataset
The developers should have access to the dataset for which they intend to develop the datatool.
Complete Documentation of the Source Dataset
The developers must have access to the Bonseyes dataset documentation, which clearly explains the contents of the dataset, annotations covered, and scope of usage.
JSON data model from dataset documentation
Developers must create a JSON data model, which is an example JSON file defining the structure for the annotations after they are translated by the datatool. An example for the JSON data model file can be referred from JSON data model Example. This file serves as the reference for translating the source dataset annotations, according to the structure present in the JSON file. Later in the datatool development, they will map this structure to a python-based data model. More details on this are provided in the Step 4: Implement Python Data Model for the Annotations section of this documentation.
Technical Requirements for the Development Environment
Following technical requirements must be satisfied by the development environment:
Make sure you have set up the local environment as explained in Prerequisites
Python >= 3.9
Docker >= 19.03
Create Datatool
Datatool setup (How to use Template):
The datatool template helps developers to quickly create the repository structure for a new datatool by providing all the required code components and their stubs. This section describes the step-by-step process to use the datatool template for the creation of a new datatool. All the steps are described with examples in the following:
Step 1:
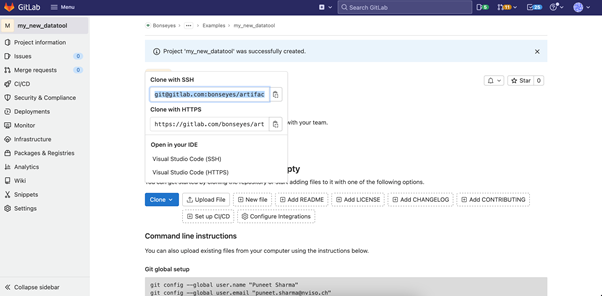
Create a blank GitLab project where the new datatool needs to be pushed. Bellow, an example for the creation of a blank project in GitLab is shown.

Note: Please make sure there are no special character in the beginning of the name of the project and there are no capital letters in the “Project slug”. Having these might cause an issue later when you need to push the datatool docker image to Gitlab.
Step 2:
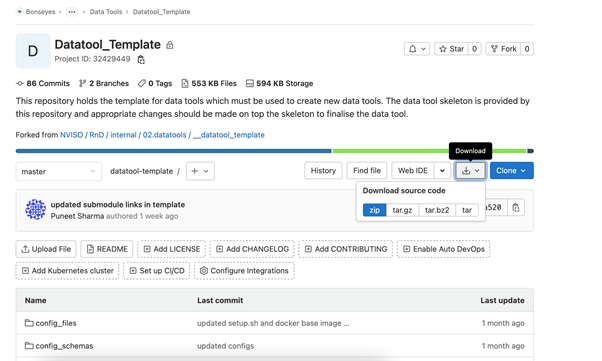
Clone or download the Datatool Template repository from Gitlab to your workstation.
If cloning:
git clone git@gitlab.com:bonseyes/artifacts/data_tools/datatool-template.git <LOCAL_ _PATH_FOR_DATATOOL_TEMPLATE>
If downloading, see figure bellow on how to download:
Step 3:
Copy the Git clone link of the newly created datatool repository from step 1 and run “setup.sh” script from inside the data tool template. Next figure shows the link to copy.
Once the git clone link is copied, please use the commands:
cd < LOCAL_ PATH_FOR_DATATOOL_TEMPLATE>

source setup.sh \
-l <DATATOOL_CLONE_LINK> \
-p <PATH_WHERE_TO_SETUP_DATATOOL>

-------------------------------------------------------------
Required arguments:
-l            Git clone link for the newly created datatool
-p           Local path where the new datatool must be setup
Note: Please make sure the -p parameter always points to the path outside the current working directory, otherwise the script will recursively try to copy the template contents and will throw error once the recursion fails.
Once the setup script is successfully completed, the expected output should look like the one depicted in the figure bellow:
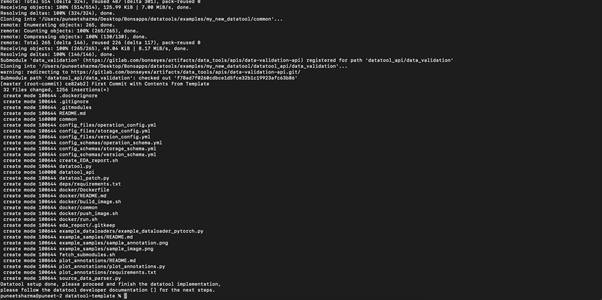
By the end of step 3, you should have the new datatool repository setup on your local machine. You can use the typical git commands like “git status” and “git log” to check the status and history of the repository. “git log” command should show one commit which should be the initial commit from the datatool template.
The figure bellow shows the example of datatool repository status after successful initialization from datatool template:

Step 4:
Once you have setup your new datatool repository successfully, please use the command below to push your changes to GitLab.
git push -u origin master
Datatool Structure
Once the repository structure for the new datatool has been successfully created using the datatool template, next step is to complete the implementation by adding code and content to this repository. This section provides the details and steps for finishing the datatool implementation by using the skeleton created in the previous steps.
Next figure depicts the directory structure of the new datatool repository once “setup.sh” script from datatool template has successfully finished.
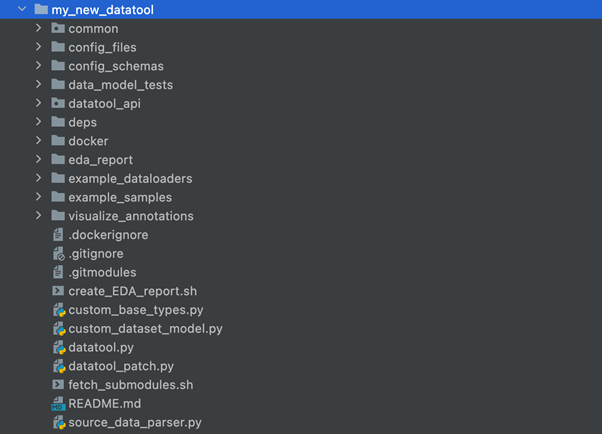
The contents of the newly created datatool repository’s root directory are briefly described in the following:
datatool.py: Orchestrator script that connects the boiler place code with user defined code and starts the datatool processing at runtime.
common: Submodule containing the boilerplate code and utility functions.
config_files: Directory containing all the configuration files for the datatool. The config files define the versioning, memory consumption, and accessibility of the source dataset for running the datatool. More details on this are provided in the Step 1: Update Config Files section.
config_schemas: Directory containing the schema files for all the configuration files present in config_files directory. At runtime, the configuration files are validated against the corresponding schema files to ensure correctness for the inputs. More details on this are provided in the Step 2: Update Config Schema Files section.
datatool_api: Submodule containing the python-based API, which helps the developers in translating the source dataset annotations to the standard format. The API provides a default data model, which can be used for translating the source dataset as per the structure provided by this data model.
In addition, it also provides a lower-level API that can be used to create custom data models if developers cannot use the default data model and want to create their own data model instead. For more details on the data model, please refer to the Data Model section.
data_model_tests: Directory containing unit test script, which can be used to test if the data model classes correctly handle the annotations formatted as per the data model format. It contains a test_dataset.json file containing the annotations for a few samples as per the data model format, and it is used by the unit tests to detect any possible issues like wrong types, wrong data, wrong serialization and de-serialization etc. More details on this are provided in Step 5: Create Unit Tests for the Data model section.
deps: Directory containing the requirements.txt file which defines all the python dependency modules for the datatool. More details on this are provided in the Step 3: Add Python Dependency Modules section.
fetch_submodules.sh: Shell script used by the datatool users to correctly fetch datatool’s dependency submodules.
source_data_parser.py: Script responsible for mapping the source dataset annotations to the standard data model objects. Datatool developers will need to provide the implementations for one or more methods in this script based on their selected data model (default or custom). More details on this are provided in the Step 4: Complete Source Dataset Parser Implementation section.
custom_base_types.py: If datatool developers intend to create and use a custom data model for translating the source dataset, this file should contain the definitions for the base types of their data model. More details on this are provided in the Data Model and Step 6: Complete Source Dataset Parser Implementation sections.
custom_dataset_model.py: If datatool developers intend to create and use a custom data model, this file should contain the definition for their topmost level class, which encapsulates the base types defined in custom_base_types.py. This class represents the dataset instance and it used to interact with the datatool output. Initially a stub for this class is provided, and if required, datatool developers are needed to add definition to it. More details on this are provided in the Data Model and Step 6: Complete Source Dataset Parser Implementation sections.
datatool_patch.py: Sometimes it is desired that the datatool output be processed further for steps like data cleaning etc. This script should be used to define such steps on top of the datatool output. Initially a stub is provided in the script, which needs to be implemented by the datatool developers in case additional processing steps are required on top of datatool output. More details on this are provided in the Step 7: Complete Datatool Patch Implementation (Optional) section.
visualize_annotations: Directory containing the python script, which can be used for randomly drawing some samples from the datatool output and visualizing the annotations over them. Initially only stubs are provided in the script and the developers need to finish the implementation for these stubs. More details on this are provided in the Step 8: Complete Visualize Annotations Implementation section.
example_samples: Directory containing the example samples from the source dataset and an example of the visualized annotation over the sample. Initially placeholder samples are provided in the directory which must be replaced by the actual sample examples and visualized annotations. More details on are provided in the Step 9: Update User Documentation section.
create_EDA_report.sh: Shell script, which needs to be run to generate the Exploratory Data Analysis (EDA) Report from the datatool output. Once the datatool implementation is completed, the developers need to execute this script to generate the EDA report and upload it to the eda_report directory. More details on this are provided in the Step 10: Generate and Add EDA Report section.
README.md: Datatool user guide. There are some placeholders in this file for which information needs to be added by the datatool developers. More details on this are provided in Step 9: Update User Documentation section.
eda_report: Directory containing the Exploratory Data Analysis (EDA) report for the annotations. It as a placeholder directory and developers need to add the EDA report to it once they have finished the datatool implementation. More details on this are provided in the Step 10: Generate and Add EDA Report section.
docker: Directory containing the Dockerfile to build docker image for the datatool, build, run and push scripts for the docker image and all the docker based usage documentation. More details on this are provided in the Step 11: Build, Test and Push the Docker Image section.
example_dataloaders: Directory containing the example code, which shows how users can use the datatool output to create data loaders for model training. Initially only stubs are provided in the code, and datatool developers will need to finish the implementation for these stubs. More details on this are provided in the Step 12: Complete Example Dataloader Implementation section.
.dockerignore: Standard file specifying list of artifacts not included in docker context while creating a docker image for the datatool.
.gitignore: Standard file specifying the list of artifacts that should not be version controlled by git.
.gitmodules: Standard file pointing to the git submodules added to the repository.
Data Model
In the context of datatools, a data model is a python-based model that defines all elements of a dataset and organizes these elements in a specific structure often termed as “Ontology”. The Ontology defines how dataset elements relate to one another and defines a hierarchy for them.
Concretely for datatools, a data model is a collection of python classes, where each python class represents a dataset element. It is very similar to an Object Relational Mapping (ORM), where each class in the mapping defines all attributes it contains and specifies the constraints for every attribute. The top-level class in the data model represents the whole dataset and encapsulates the other model class instances in it.
Next figure provides a small example for a data model where “Dataset” class represents the dataset, which contains a dictionary of “ImageSample” class instances and a Metadata class Instance. The ImageSamples and Metadata classes define their attributes in their respective definitions.
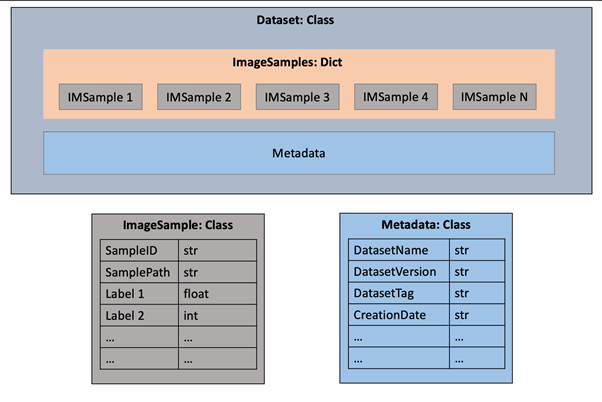
By having a data model, developers achieve the following goals:
Provide definition and meaning to the data elements
Provide structure to the dataset
Enforce constraints on data values to perform validations
Provide standard interfaces for data handling like load, read, writes etc.
The Datatool API provides a default data model, which can used by the developers for translating the source dataset annotations, or they can create a custom data model by following the instructions and example on How to Create a Custom Data Model.
Datatool Implementation
Once the datatool developers have successfully finished the setup for their repository and verified the contents, following steps are required to be performed to complete the implementation for the datatool:
Step 1: Update Config Files
The directory “config_files” contains yml files defining all the configuration related parameters for the datatool. Developers need to update the fields in these files to reflect the configuration they intend to provide for their datatool. The files are described below:
operation_config.yml: This file contains the operational parameters for the datatool. Table 1 describes the fields and options for each field in this file.
operation_mode: This field dictates the memory consumption by the datatool while translating the source dataset to the standard format. Possible options for “operation_mode” are:
memory: All the python objects containing the translated annotations are stored in memory. This mode is the fastest and most memory intensive and should be used when memory consumption is not a concern, given the size of the source dataset annotations.
disk: Instead of holding the actual annotation objects, only the pointers to the annotation objects are stored in memory while the actual annotation objects are dumped on disk. This mode is slowest and least memory intensive and should be used when host system has a relatively low memory size compared to the size of the source dataset annotations.
ramdisk: This mode provides the middle ground between memory and disk modes and stored the serialized representations of the annotation objects in memory instead of the actual objects. This provides the balance between speed and memory and is useful in cases when such a balance is needed.
validate_sample_paths: This field dictates if the samples files paths must be validated (checked if the sample files exist for all annotations) while dumping the final JSON file from the datatool. Possible options for “validate_sample_paths” are:
true: Validate sample file paths
false: Do not validate sample file paths
An example operation_config.yml for a completed datatool can be referred from Datatool Operation Config Example.
storage_config.yml: This file dictates how the source dataset will be accessed by the datatool for translating it to the standard format. All the fields and options for each field are described below:
storage: Where the source dataset is stored. Possible options for “storage” are:
local: Datatool developers should use this value for storage if they do not want to or cannot share the source dataset along with the datatool. If the storage is local, it becomes the responsibility of datatool user to access and download the source dataset to their host system in order to run the datatool.
s3: If it is possible to share the source dataset by the datatool developers, they can archive and store the source dataset in an amazon s3 bucket and set the storage field value to “s3”. At runtime, the datatool users can then simply provide their credentials for the s3 bucket containing the archived source dataset and it will be automatically downloaded and processed by the datatool. For archiving and uploading the source dataset to s3, please follow the steps from Archive and Upload the Source Dataset to Remote Storage.
synology: If it is possible to share the source dataset by the datatool developers, they can archive and store the source dataset in a Synology NAS server and set the storage field value to “synology”. At runtime, the datatool users can then simply provide their credentials for the NAS server containing the archived source dataset and it will be automatically downloaded and processed by the datatool. For archiving and uploading the source dataset to synology NAS server, please follow the steps from Archive and Upload the Source Dataset to Remote Storage.
An example storage_config.yml for a completed datatool can be referred from Datatool Storage Config Example.
version_config.yml: This file deals with the versioning aspect of the datatool. It sets the name for the datatool and lists all the available versions and their associated tags for the datatool. In addition, it also defines the default datatool version to run if no version is specified at run time. For more explanation on datatool versioning and tagging and what they represent, please refer to Data Traceability with Versioning and Tagging section of this document.
This file must contain at least one version and tag and developers can add more versions or tags depending upon their source dataset and use case. The developers can either use the pre-existing version “original_update00” and tag “default” or can define their own version name and tag based on their preference.
Note: In case of defining new tag names, the developers need to update the “config_schemas/version_schema.yml” file to add possible tag names for any version. Please refer to the Step 2: Update Config Schema Files section.
All the fields in “version_config.yml” are described below:
datatool_name: Name of the datatool, a descriptive name should be chosen by the developers for this field.
available_versions_and_tags: This field lists all the available datatool versions and for each version lists all the available tags. In addition, for each version there is a special attribute called “tag_data_from” which is used if any “Logical Tags” are defined for that version. “tag_data_from” field maps the physical tag from which the source data must be used to process logical tags. As a concrete example, if a developer defines a logical tag “cropped”, which creates cropped images in the datatool output instead of full-size images and if this logical tag is based on the data from physical tag “default”, then “tag_data_from” field should contain a mapping like below, which tells the datatool that in order to process and create output for “cropped” tag, it must use the data from “default” tag:
“tag_data_from”: {
    “cropped”: “default”
}
current_version: The field provides the default datatool version to run when no version is specified by the datatool user at run time.
An example version_config.yml for an implementation-complete datatool can be referred from Datatool Version Config Example.
Step 2: Update Config Schema Files
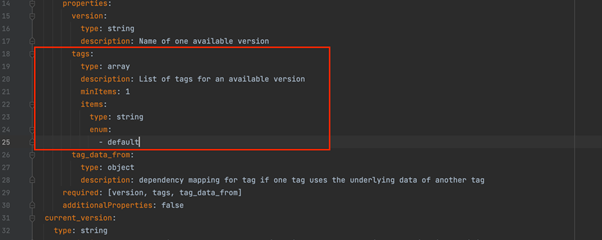
In case the datatool developers have defined new tags for any version in the “version_config.yml” file, they need to update the “config_schemas/version_schema.yml” file and add all the extra tag names in the list of possible tag values. Next figure highlights the location in the schema file where all the tags must be added in the enum list.
An example version_schema.yml for an implementation-complete datatool can be referred from Datatool Version Config Example.
Step 3: Add Python Dependency Modules
File “deps/requirements.txt” is intended to list all the python dependency modules required by the datatool. Developers must add all the dependency modules with their exact versions in this file. For example, if datatool needs to use pandas with version 1.3.2, an entry must be added to the file with “pandas==1.3.2”.
Note: Before adding the dependency modules in this file, it is advised to check the “datatool_api/deps/requirements.txt” and “common/deps/requirements.txt” files as there might be some modules already added in these files. In such cases, developers can re-use these modules without adding them again.
Step 4: Implement Python Data Model for the Annotations
As mentioned in the Datatool Development Pre-requisites section, before starting the development for the datatool, developers must have the documentation ready for the source dataset, which provides clear understanding of the source dataset contents, and the annotations covered by the dataset.
Based on this understanding of the annotations, developers must create a JSON data model, which is an example JSON file defining the structure for the annotations after they are translated by the datatool. The file serves as the reference for translating the source dataset annotations according to the structure present in this example JSON file. An example for the JSON data model file can be referred from JSON data model Example.
Once the JSON data model definition has been created using the example JSON file, developers need to map it to a python-based data model, which maps the JSON annotations to python objects. The data model can then load the JSON file, perform validations on the annotations, such as type checking, value ranges etc. To create the python data model, developers have following two options:
1. Re-use the existing data model provided with the Datatool API
The Datatool API provides a default data model, which defines common base types such as Head Pose, Bounding Box, 2d and 3d Landmarks, Emotions, Actions Units, Face, Eyes, Body etc. and has a specific ontology for the annotations.
This data model can be used in cases where there are not very large gaps between the data model definition coming from example JSON and the structure provided by the default data model. In such a scenario, developers can align their data model definition in example JSON with the default data model structure and can reuse this model. An example of such a case can be referred from Re-using the default data model Example.
2. Define a Custom Data Model
Developers need to define a custom data model in cases when:
There are large gaps between the default data model structure and the data model definition present inside the example JSON.
There are some missing annotation types which are not provided in the default data model.
In such cases, developers can define their custom data types and arrange them according to the ontology defined in the example JSON. This follows a two-step process where the steps are:
Define Custom Data Types in custom_base_types.py file: All the custom data types should be defined in the custom_base_types.py file which is provided as a stub script in the datatool repository
Update DTDatasetCustom class in custom_dataset_model.py file to Define Top Level Class Encapsulating the Custom Types: Once all the custom data types are defined, developers need to complete the implementation of the top-level class, which represent the dataset and encapsulates the custom base types. File “custom_dataset_model.py” provides a placeholder class with stub methods which needs to be completed by the developers.
To complete the implementation for this class, following steps must be taken:
Add all class attributes
Add implementation for “to_pandas_frame” method.
Add implementation for “to_pandas_frame_for_report” method. This method is very similar to “to_pandas_frame” method and should only export columns which are required for EDA reporting.
Documentation on How to Create a Custom Data Model provides all the details for creating a custom data model. An example of a custom data model can be referred from Custom Data Model Example.
Step 5: Create Unit Tests for the Data model
Once the data model has been defined, developers need to create unit tests to verify the correctness of the data model. The unit tests should cover cases to check if the data model can de-serialize the example JSON correctly, read the data correctly and any typing checks. Python script “data_model_tests/data_model_tests.py” provides stubs for the unit tests which must be implemented by the developers. One example for the unit tests can be referred from Data Model Unit Tests Example.
Note: The developers are required to add the unit test report to the datatool repository.
Step 6: Complete Source Dataset Parser Implementation
The next step is to complete the implementation for parsing code which translates the source dataset annotations to data model objects.
The choice of the data model decides the way in which the source dataset parsing, and translation code must be written. Both ways are described in the following:
Option1: Source Dataset Parser Implementation using Default Data Model
If using default data model, developers need to take the following steps:
Update parse_file() method in source_data_parser.py file
The source_data_parser.py file provides the parse_file() method stub with a small example in the doc-string. If using the default data model, the datatool’s boilerplate code locates the source dataset, and sends files from the source dataset to this method in a random order. Along with the file, the information like file name, file extension, datatool version, datatool tag etc. are also passed. The method then needs to decide how to process the file based on all the information available.
For example, if the file extension is of type .jpg or .png, the method can simply read and save the file in a directory. On the other hand, if it is a file containing annotations (.txt, .csv, .json etc.) the method can read the file, extract annotations from it and map them to the data model objects. A complete example for this method where datatool uses the default data model can be referred from Parse File Method Example.
Optionally update post_process() method in source_data_parser.py file
While using the default data model, sometimes it is not possible to map annotations to data model objects inside “parse_file” method. A concrete example of such a scenario could be a source dataset for head pose in which annotations are divided into 3 text files with first, second and third file containing annotations for Yaw, Pitch and Roll angles respectively for each sample image.
In this scenario, it is not possible to create a complete head pose object by just parsing one file at a time, and some post processing is required to combine the parsed data. The “post_process” method allows developers to handle such cases by enabling them to add any post processing logic, once “parse_file” method has processed all files in the source dataset.
As an example, the dataset for head pose introduced above could be handled by letting “parse_file” method store the Yaw, Pitch and Roll angles in an auxiliary storage and “post_process” method can then be used to combine the three angles to create head pose objects. Unlike “parse_file” method, “post_process” method is called by the datatool orchestrator exactly once at the end. In most of the cases, the developers will not need to use this method, but if needed it can be leveraged for adding any post processing logic.
Option 2: Source Dataset Parser Implementation using Custom Data Model
If developers have defined a custom data model to translate source dataset annotations, they need to take the following steps:
Update extract() method in source_data_parser.py file
Once the custom data model is defined in the previous steps, developers need to update the “extract” method inside “source_data_parser.py” file to map the source dataset annotations to the objects from custom data model. The method receives the path to the source dataset and parses files from it to create annotation objects defined as per the custom data model. An example for the for extract method where the datatool uses the custom data model can be referred from Extract Method Example.
Step 7: Complete Datatool Patch Implementation (Optional)
In some special cases, it is required to process the datatool output further. One such example could be to remove annotations which are incorrect. The datatools provide a way to enable developers handle such cases by writing datatool patches.
File “datatool_patch.py” provides a placeholder that can be used by the developers to add code that apply any patching logic on the datatool output annotations. If required, developers can implement the “create_patched_dataset” method in the file, which should return the patched dataset instance after modifying/deleting the annotations from input dataset instance based on the patch logic.
Step 8: Complete Visualize Annotations Implementation
Script “visualize_annotations/visualize_annotations.py” intends to provide a way to perform qualitative verification for the dataset annotations by randomly drawing some samples from the datatool output and plotting the annotations on these samples. The developers need to complete the implementation for the stub methods present in the script. The methods are:
run(): Load the datatool output and randomly draw samples from it.
plot(): Plot the annotations for randomly drawn samples. The developers can leverage some OpenCV based drawing utilities from the “common” submodule for this purpose.
An example of completed visualize_annotations.py script be referred from Visualize Annotations Script Example.
Step 9: Update User Documentation
README.md file in the datatool repository serves as the user documentation for the datatool. Once implementation and testing for the datatool code is complete, the developers need to update the README.md file to update the documentation. The steps to update the documentation are:
Update datatool name and description.
Update the list of annotations provided by the datatool.
Update the “Available Versions and Tags” table.
Add source dataset download instructions in “How to Download the Source Dataset” for each available version.
Add example sample and visualized annotation in the “example_samples” directory. Update the image references in “Example Samples and Annotations” section.
Add the overview collage image to the “example_samples” directory. Update the reference to overview collage reference in “Visualize Annotations” Section. The collage is generated as an output from the “visualize_annotations.py” script present inside “visualize_annotations” directory.
Add the datatool maintainer details (Name and email) in the “Maintenance” section.
An example datatool user documentation can be referred from Datatool User Documentation Example.
Step 10: Generate and Add EDA Report
The eda_report directory inside the datatool repository is intended to contain the Exploratory Data Analysis Report for the datatool output. This report helps the datatool users in better understanding the dataset and gain statistical insights on the annotations. To generate and add the EDA report, the developers need to follow the steps below:
Execute shell script “create_EDA_report.sh” to generate the EDA report.
Once report is generated, add it to the datatool repository as a git large file. The developers need to install “git-lfs” on their host system to avail the git large file storage feature. Once installed, execute the following commands to add the report:
# Must be run only once per user from home directory if you have installed git-lfs for the first time.

git lfs install
cd <WORKING_DIR>

cp -r <GENERATED_REPORT_DIR>/* eda_report

git lfs track "*.html"

git add .gitattributes

git add eda_report

git commit -m “added EDA report to datatool”
An example EDA report for a datatool can be referred from Example EDA Report.
Step 11: Build, Test and Push the Docker Image
As mentioned previously, datatools are intended to be used as containerized utilities to sandbox all the dependencies and environment running the datatool. Once implementation for the datatool code is finished and tested, datatool developers need to build the docker image, test it, and push the image to datatool GitLab container registry. The steps to perform the dockerization are the following:
Update the “docker/Dockerfile” if there are some special packages that need to be installed in the docker image. In most cases, this step will not be required.
Execute the shell script “docker/build_image.sh” to build the docker image. Please refer to the Datatool Docker Documentation for more details.
Test the docker image by executing the “docker/run.sh” script. Please refer to the Datatool Docker Documentation for more details.
Push the docker image to its container registry by executing the “docker/push_image.sh” script. Please refer to the Datatool Docker Documentation for more details.
An example of a built and pushed docker image can be referred from Datatool Docker Image Example.
Step 12: Complete Example Dataloader Implementation
Python script “example_dataloaders/example_dataloader_pytorch.py” intends to provide an example of how to load the datatool output and use it for subsequent tasks like model training.
The script contains the skeleton code for a pytorch based data loader and datatool developers need to complete the implementation for this example by following the steps below:
Provide description of example task and clearly state the assumptions on top of the file using docstrings
Update the __init__() method to load the datatool output and perform any preprocessing (like calculating the dataset length, removing some unrequired samples etc.).
Update the __len__() method to return the length of the dataset.
Update __get_item__() method to return the dataset samples and annotations.
Update the main() method to create and run a test.
An example of a completed example data loader can be referred from Dataloader Example.