Definition
Technical explanation about creating a new AI Asset.
Create AI Asset
This section describes how to setup local and server environment first and then how to create and develop new AI Assets:
Setup
In order to start developing new AI Asset first complete the initial setup
Gitlab setup
Create Gitlab Account - GitLab Registration
Setup your GitLab account and add ssh key - Gitlab & SSH keys
Create empty GitLab repository named <BonseyesAIAssetName> in your dedicated group
Local setup
Setup localhost workstation/laptop for development, ensure that you have the following software installed:
NVIDIA Drivers for your graphics card - NVIDIA Autodetect driver
Docker - Install on Ubuntu
NVIDIA container toolkit - Install container-toolkit
Git
Python3.6+
HPC setup
Setup HPC for training and image builds, ensure that you have the following software installed:
NVIDIA Drivers for your graphics card - NVIDIA Autodetect driver
Docker - Install on Ubuntu
NVIDIA container toolkit - Install container-toolkit
Docker Buildx - Install Buildx
Install qemu and enable aarch64 emulation:
# Install the qemu packages
sudo apt-get install qemu binfmt-support qemu-user-static
# Enable emulation
docker run --rm --privileged multiarch/qemu-user-static --reset -p yes
Git
Python3.6+
GitLab runner setup on HPC instance
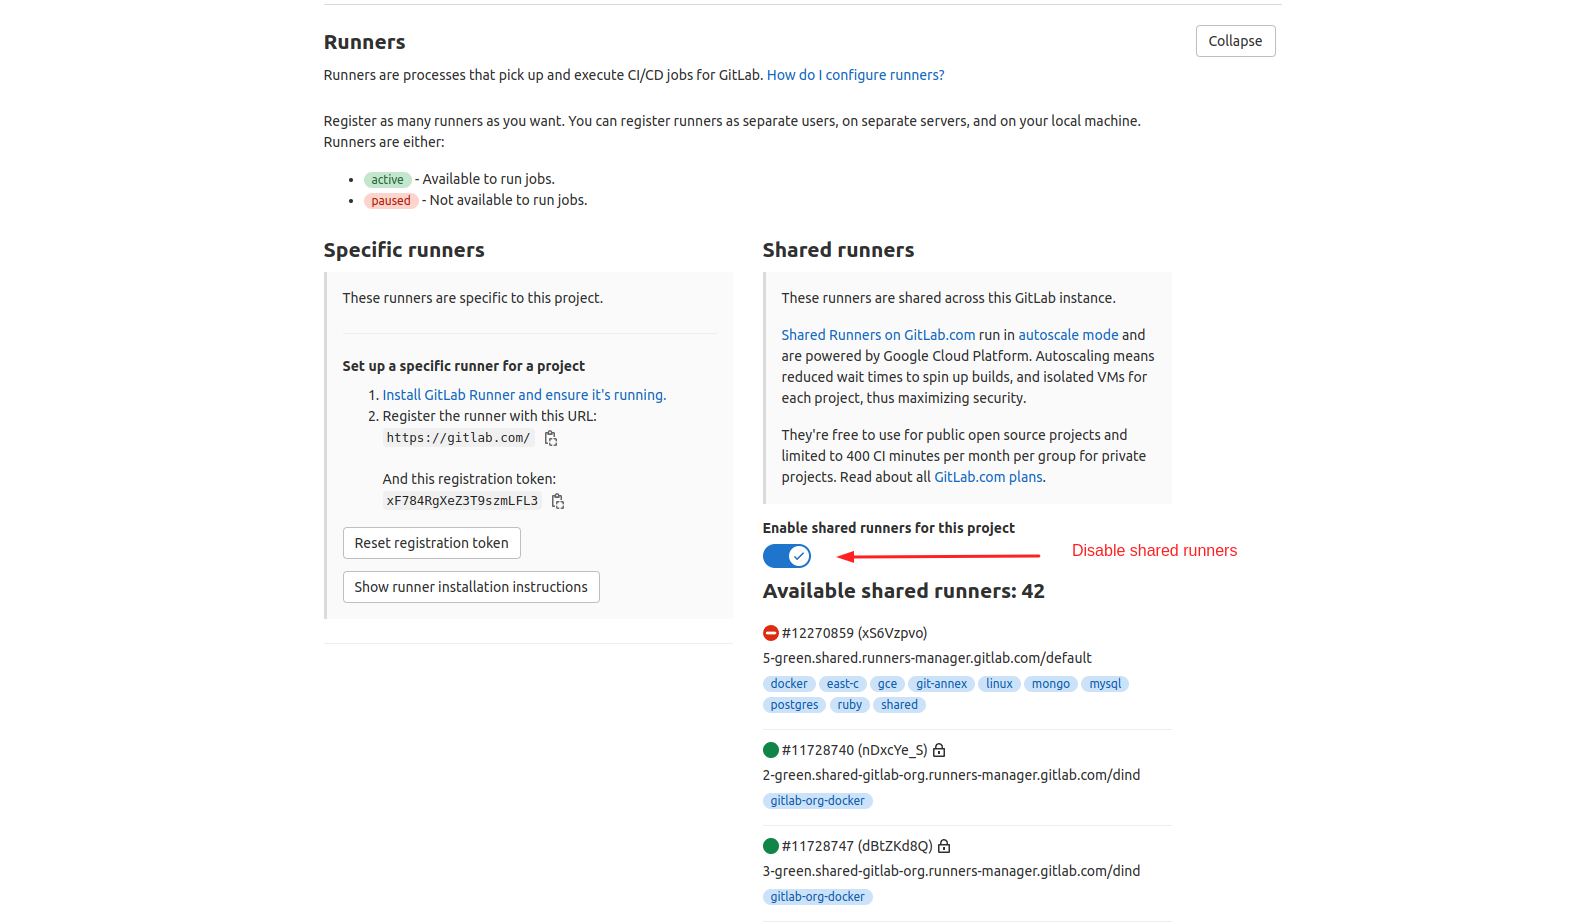
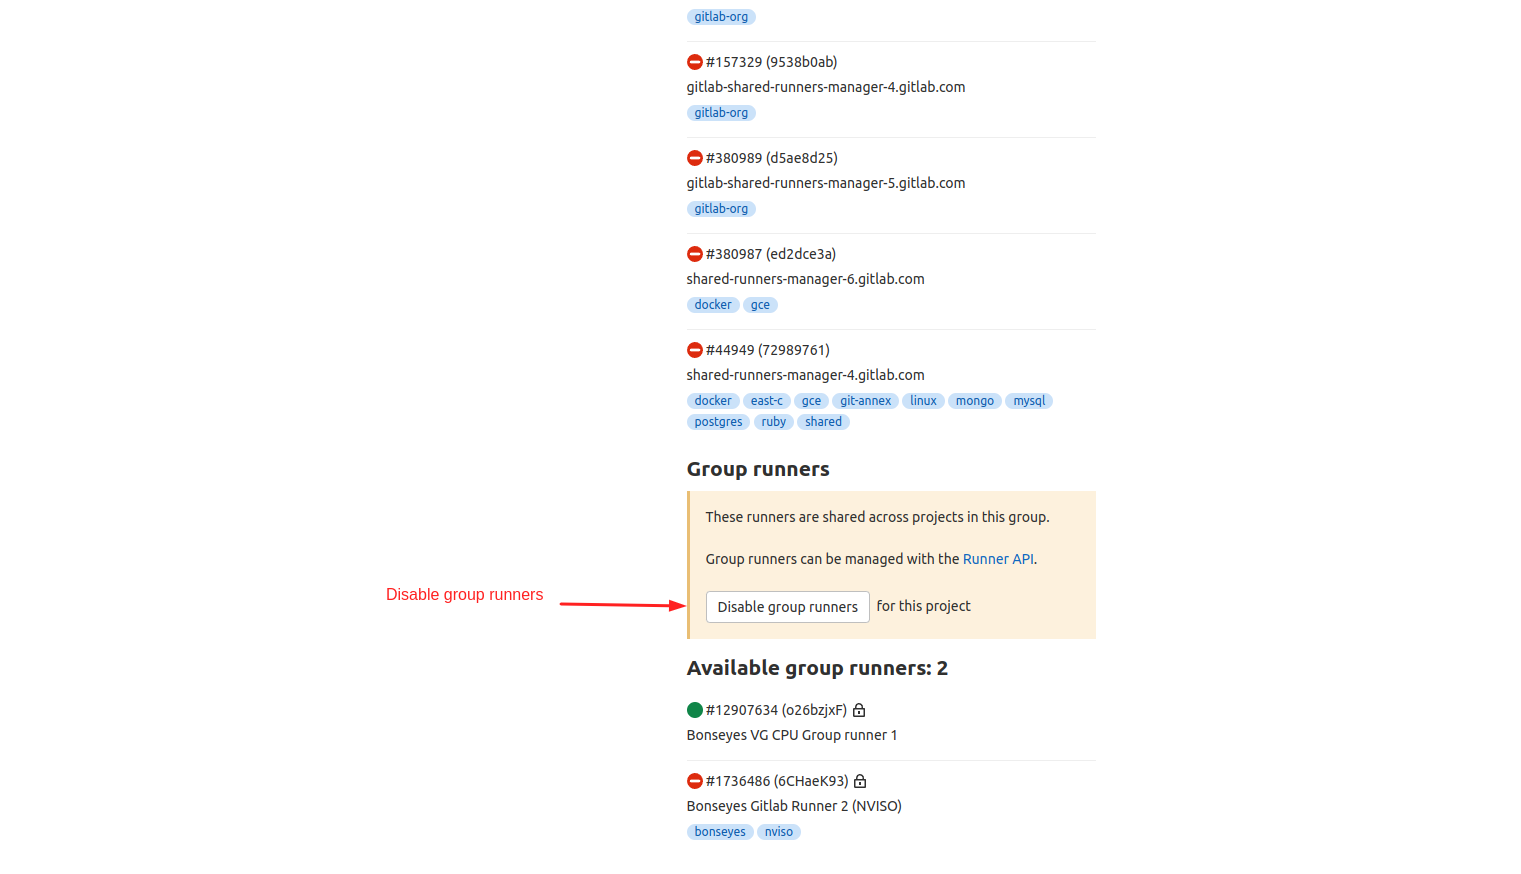
1. On your GitLab repository, open Settings > CI/CD > Runners in order to disable shared and group runners and add specific runner required to support automated preconfigured CI/CD pipelines.
Download Gitlab Runner installation script and copy script to the HPC instance
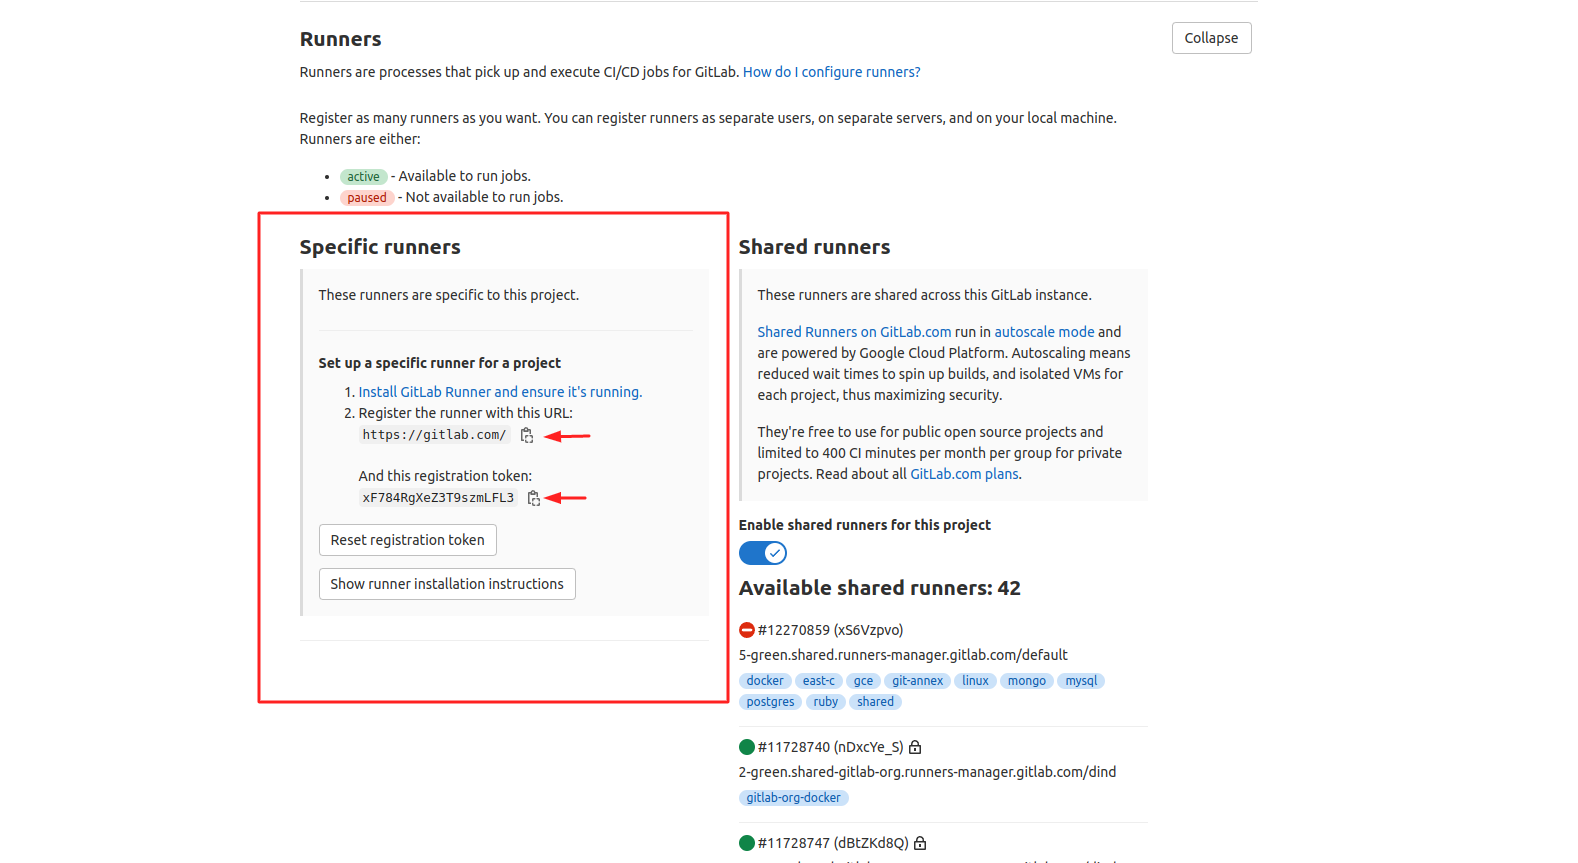
setup-runner.shFind specific runner configuration credentials on your GitLab repository under Settings > CI/CD > Runners
Execute script on the HPC instance:
# Change file mod permission
sudo chmod +x setup-runner.sh

# Execute script providing proper values
./setup-runner.sh <runner_name> https://gitlab.com/ <repository_registration_token>

# Example run
./setup-runner.sh bonseyes_3ddfa https://gitlab.com/ HuQV-VGty-HL7vprN5Rb
Start new project
Clone AIAssetContainerGenerator on your local machine and
Follow AIAssetContainerGenerator README.md to create new AI Asset boilerplate project
Initialize git in newly created boilerplate project
If you plan to use existing network implementation as baseline attach it as submodule in
/sourcedirectory of boilerplate rootgit submodule add <repo-url> /source/<repo-name>
When creating new AI Asset Bonseyes framework suggests the following Git workflow:
Use
masterbranch for stable tested release tagged with version e.gv1.0, v2.0, ...Use
devbranch for daily developmentUse
feature/feature_namebranch fromdevto implement new featuresTag commits on
devandmasterbranches to trigger docker image builds
Follow GitLab instructions in your newly created repo on how to push existing folder
Every commit on certain branch triggers GitLab runner, which executes
.gitlab-ci.ymlfile in your project. .gitlab-ci decides which stages (of possible build, test, push, package and pages) for all listed platforms in it will be executed. Which stages will be executed depends on which branch we are currently.If you encounter git error regarding unsafe direcotries during container builds, modify
.gitlab-ci.ymland include linegit config --global --add safe.directory /path/to/unsafe/dir. If this does not solve the issue try to use--systeminstead of--globalgit option.
Local development workflow
Pull x86_64 image that was built during CI/CD process or build image locally
# Option 1: Pull built image (check registry tab on your GitLab project web page for url)
docker pull <image-url>

# Option 2: Build image on your local machine
python3 <bonseyes_aiasset_name>/docker/build.py \
    --platform x86_64 \
    --profile <bonseyes_aiasset_name>/docker/profiles/x86_64/ubuntu18.04_cuda10.2_python3.6_tensorrt7.0.yml \
    --image-name <bonseyes_aiasset_name>x86_64:<v1.0>_cuda10.2_tensorrt7.0 \
    --device cuda
buildscript calls Dockerfile on specified platform (x86_64, Jetson devices and RaspberryPi4) and device (GPU or CPU). In Dockerfile you should run yoursetup.pyscript which contains all python packages with their versions used in your AI Asset for x86_64, Jetson devices and RaspberryPi4.Dockerfiles for x86_64, Jetson and RaspberryPi4 are stored in
/<bonseyes_aiasset_name>/docker/platforms/Pytorch, CMake, OpenCV, ONNXRuntime, ONNX, TensorRT, Python versions which will be installed during docker build are written in
/<bonseyes_aiasset_name>/docker/profiles/. These versions are sent as arguments to Dockerfiles.Existing x86_64 profiles:
ubuntu18.04_cuda10.2_python3.6_tensorrt7.0.yml
ubuntu20.04_cuda11.4_python3.8_tensorrt8.0.yml
ubuntu18.04_python3.7.yml
Existing NVIDIA Jetson profiles:
jetpack4.4.yml
jetpack4.6.yml
For RaspberryPi4 available profile is:
rpi_arm64v8.yml
The result of build script (if everything works properly) is new docker image.
Note
If you want to make minor changes (very small changes from official code instead of writing in your Bonseyes AI Asset) in submodule, you mustn’t commit changes to official source repository. Instead of committing changes to official repository, you need to create git patch and save it to
/source/patch/directory. To apply patch to submodule use command in your container:cd /app/source/<submodule_name> && git apply /app/source/patch/modification_1.patch
You also need to add this command in Dockerfile for building image with applying patch before setup.
Run x86_64 image and mount your project root to /app
If you are using directory with images and annotations generated by DataTool, you should mount directory with datasets and annotations to
<bonseyes_aiasset_name>/data/storagedirectory while executing docker run command. In this case you should run built container with:# Example how to run built container when you are using dataset and its annotations generated by DataTool cd <bonseyes_aiasset_name> docker run --name <bonseyes_aiasset_name> \ --privileged --rm -it \ --gpus 0 \ --ipc=host \ -p 8888:8888 \ -v $(pwd):/app \ -v /path/to/processed/dataset1:/app/<bonseyes_aiasset_name>/data/dataset1 \ -v /path/to/custom_base_types.py:/app/<bonseyes_aiasset_name>/data/dataset1/custom_base_types.py \ -v /path/to/custom_dataset_model.py:/app/<bonseyes_aiasset_name>/data/dataset1/custom_dataset_model.py \ -v /path/to/processed/dataset2:/app/<bonseyes_aiasset_name>/data/dataset2 \ -v /path/to/custom_base_types.py:/app/<bonseyes_aiasset_name>/data/dataset2/custom_base_types.py \ -v /path/to/custom_dataset_model.py:/app/<bonseyes_aiasset_name>/data/dataset2/custom_dataset_model.py \ -v /tmp/.X11-unix:/tmp/.X11-unix \ --device /dev/video0 \ -e DISPLAY=$DISPLAY \ <bonseyes_aiasset_name>x86_64:<v1.0>_cuda10.2_tensorrt7.0
At this point you can develop on your host environment using IDE of your choice and test implementation inside of running docker container
I. Data
Make sure that you correctly attached datatool requirements and mounted generated processed datasets:
Confirm that you have
datatool_apisubmodule attached in AI Assetdatadirectorycd <project_root> git submodule add -b python3.6 ../../../../../../artifacts/data_tools/apis/datatool-api.git <bonseyes_aiasset_name>/data/datatool_api git submodule update --init --recursive <bonseyes_aiasset_name>/data/datatool_apiNOTE: If your AI Asset is not in your group root you will need additionally to change the relative path of the datatool-api submodule.
Confirm that you have
custom_dataset_model.pyandcustom_base_types.pymounted to for all datasets indata/dataset1 ... data/dataset2Confirm that when you are executing
docker run, you properlly mounted directory which is result from DataTool(s) to/<bonseyes_aiasset_name>/data/dataset1folder by adding-v /path/to/dataset1:/app/<bonseyes_aiasset_name>/data/dataset1in docker run command.
Steps to Use the Datatools inside AI assets:
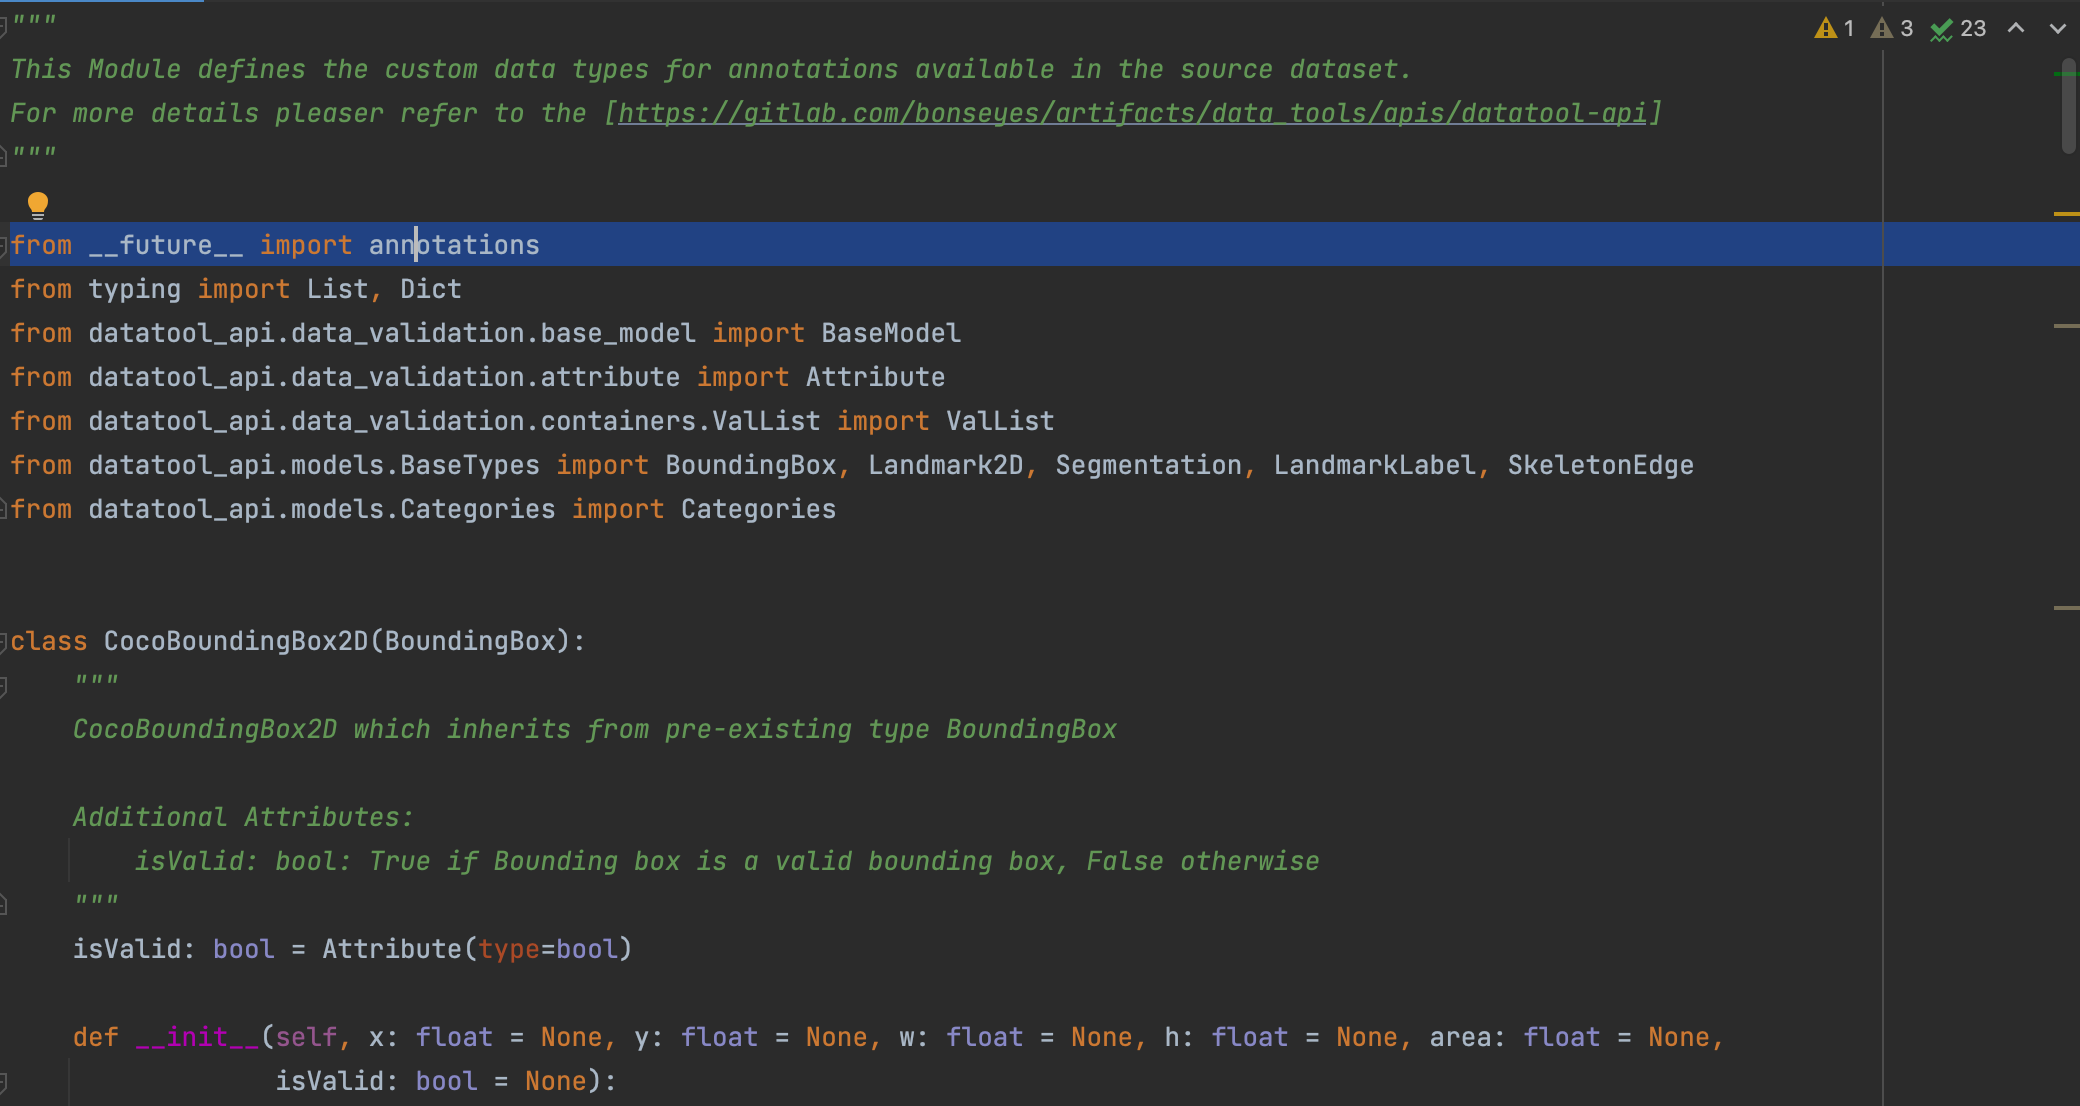
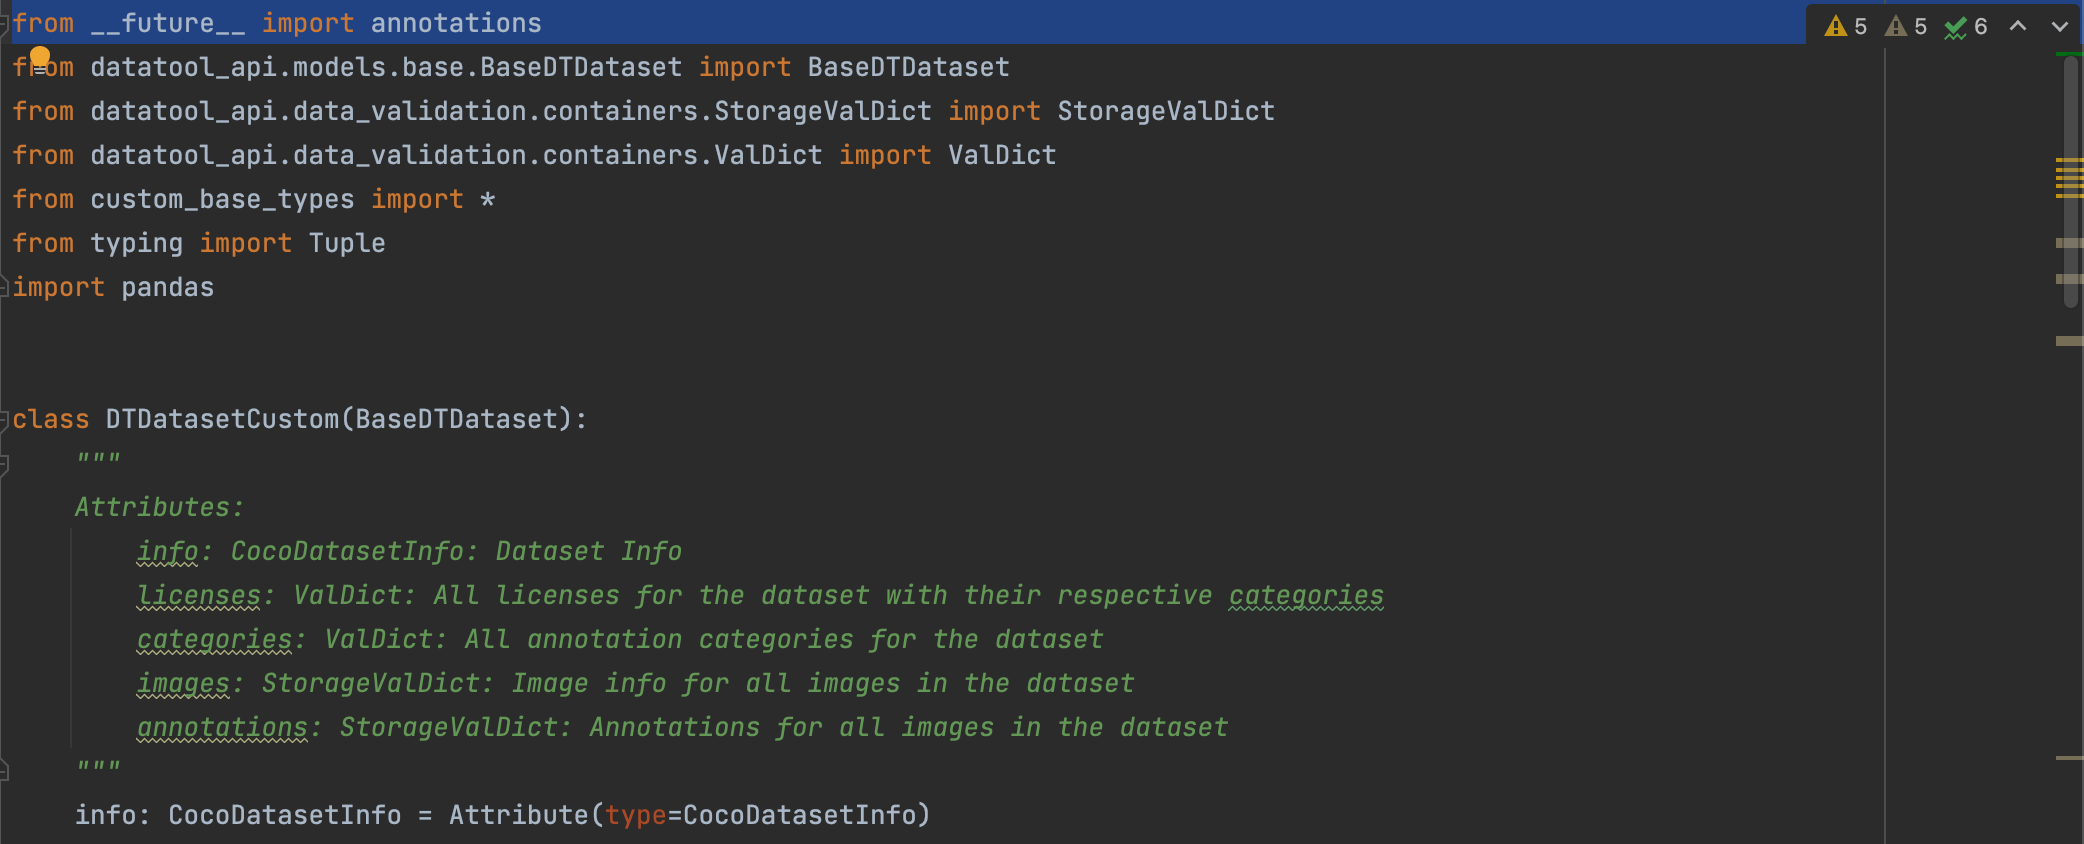
Remove __future__ imports from custom_base_types.py and custom_dataset_model.py scripts (only for AI Assets with python version < 3.8)
As part of datatool development, the AI-talents created the python based custom data model for each datatool which is defined by “custom_base_types.py” and “custom_dataset_model.py” scripts. This data model is the interface that should be used to load and read the datatool output inside AI-assets.
Since there is a mismatch on the python versions between datatools (using python >= 3.9) and AI-assets (using python3.6.9, will be updated in future), the “custom_base_types.py” and “custom_dataset_model.py” scripts need to be modified to remove __future__ imports which are not supported by python3.6.9. To do so, remove the line “from __future__ import annotations” from the two scripts. This line is generally found at the beginning of the file. Please refer to the example images below to locate the line.
Remove any return types from custom_base_model.py which are not supported due to removal of the __future__ imports (only for AI Assets with python version < 3.8)
As a consequence of removing the __future__ import from the scripts, methods inside classes can not have annotations for the return type if the return type is the same as the class type that contains the method.
To fix it, remove any return types from the “custom_dataset_model.py” script where the return type is the same as the class type. The image below shows an example where method “extract” has the “CocoBoundingBox2D” as its return type and this should be removed (hence “-> CocoBoundingBox2D” part should be removed) from the function signature.

Rename the “custom_base_types.py” and “custom_dataset_model.py” scripts in case you are using multiple data tools inside the AI-asset
In case your AI-assets uses multiple datatools and the datatools do not share the same data model, you need to rename the “custom_base_types.py” and “custom_dataset_model.py” scripts so that they are differentiable for the python interpreter at the import time.
For example if you plan to use two datatools, datatool1 and datatool2, you can rename the files to [“ custom_base_types_dt1.py”, “custom_dataset_model_dt1.py”] and “ [custom_base_types_dt2.py”, “custom_dataset_model_dt2.py”] for datatool1 and datatool2 respectively.
Import custom data model inside the data loader script
Once you have mounted the datatool output directories, mounted custom_base_types.py and custom_data_model.py scripts for each datatool after renaming them and added the Datatool API as a submodule inside your AI-asset by following the instructions provided in the AI-asset documentation, you can use the Datatool API and your custom data models to load the dataset inside your data loader scripts.
To load the datasets using the data model classes, you need to add the relative paths to the Datatool API directory, and directory for each custom data model at the top of your data loader script and then import the “DTDatasetCustom” class for each data model.
For example if you intend to load the datatool outputs from 2 datasets, you need will do the following for imports:
import sys
sys.path.append('RELATIVE_PATH_TO_DATATOOL_API')
sys.path.append('RELATIVE_PATH_TO_DATASET1')
sys.path.append('RELATIVE_PATH_TO_DATASET2')
from dataset1.custom_dataset_model_dt1 import DTDatasetCustom as Dataset_1
from dataset2.custom_dataset_model_dt2 import DTDatasetCustom as Dataset_2
Then inside your loader function, you can simply use the Dataset classes to load the respective datasets.
dt1 = Dataset_1(name='dt1', operatingMode='memory')
dt1.load_from_json('<RELATIVE_PATH_TO_DATASET1>/dataset.json')
for k, v in dt1.annotations.items():
    print(k, v.dict())

dt2 = Dataset_2(name='dt2', operatingMode='memory')
dt2.load_from_json('RELATIVE_PATH_TO_DATASET2/dataset.json')
for k, v in dt2.annotations.items():
    print(k, v.dict())
II. Train
Bonseyes AI Assets provide training package which enables running source training scripts if they exist with specified hyperparameters for different backbones in config files.
Bonseyes AI Assets training tool contains:
configdirectory which contains config files with device and system configurations, paths to datasets and annotations and hyperparameter configuration.
<bonseyes_aiasset_name>/train/__main__.pyscript which uses hyperparameters and configurations fromconfig.ymlfile and runs source training code if it exists.
Training scripts and config files can be found in AI Asset Container Generator.
Bonseyes training tool also needs training, validation and test datasets and annotations for training execution. Datasets can be downloaded and used in 2 ways:
If you want to download datasets with their original annotations which are used in source repository, you need to implement script for downloading datasets and annotations in
/<bonseyes_aiasset_name>/data/get_data.pyscriptIf you are using DataTool check how it can be used in I. Data section.
Scripts which need to be implemented and used for data and annotations downloading without DataTool you can find in AI Asset Container Generator.
Get data
Bonseyes AI Assets provide tool for downloading data with official annotations which are used in source code. It is stored in <bonseyes_aiasset_name>/data/get_data.py script which contains functions for downloading train, validation and test datasets with annotations.
In this link you can find example how those scripts are implemented in Bonseyes Openpifpaf Wholebody AI Asset.
Here is the example how you can download training dataset with annotations in Bonseyes Openpifpaf Wholebody AI Asset:
python -m bonseyes_openpifpaf_wholebody.data.get_dataset_mscoco2017 \
--download train \
--dataset wholebody
Config file
Configuration yml files in Bonseyes AI Asset training tool are used for storing device and system configurations and hyperparameters which are sent to train script as CLI arguments.
For each backbone and each training experiment, different configuration files are created. Path to this file is set as CLI argument in <bonseyes_aiasset_name>/train/__main__.py script which reads all hyperparameters and sends it to train script as CLI arguments.
Configuration file contains multiple sections with parameters inside:
device - GPU number, number of workers
hyperparameters - number of epochs, learning rate, backbone, checkpoint and batch size
data - paths to datasets and annotations files
system - output where log is written
Note
You should name config yml files by our naming convention. Example how config file can be named is following:
v3.0_shufflenetv2k16_default_641x641_fp32_config.yml
where v3.0 refers to tag version, shufflenetv2k16 is backbone name, flag default is for pretrained model from official repository, 641x641 is training input size and fp32 is model precision.
In this link you can find config file examples in Bonseyes Openpifpaf Wholebody AI Asset.
Here is the example of one config file:
device:
  loader-workers: 16
  gpu_num: 4

hyperparams:
  lr: 0.0001
  momentum: 0.95
  b-scale: 3.0
  epochs: 250
  lr-decay: [130, 140]
  lr-decay-epochs: 10
  batch-size: 16
  weight-decay: 1e-5
  basenet: "shufflenetv2k16"

data:
  dataset: "wholebody"
  wholebody-upsample: 2
  wholebody-train-annotations: /app/source/data-mscoco/annotations/person_keypoints_train2017_wholebody_pifpaf_style.json
  wholebody-val-annotations: /app/source/data-mscoco/annotations/person_keypoints_val2017_wholebody_pifpaf_style.json
  wholebody-train-image-dir: /app/source/data-mscoco/images/train2017
  wholebody-val-image-dir: /app/source/data-mscoco/images/val2017

system:
  output: "/app/bonseyes_openpifpaf_wholebody/train/outputs/openpifpaf_shufflenetv2k16_v13.pth"
train script
<bonseyes_aiasset_name>/train/__main__.py script loads yml config file, converts all hyperparameters from yml file to CLI arguments and runs source training code with extracted CLI arguments from file.
In this link you can find the example of training script in Bonseyes Openpifpaf Wholebody AI Asset.
Here is the example how <bonseyes_aiasset_name>/train/__main__.py script is called in Bonseyes Openpifpaf Wholebody AI Asset:
python3 -m bonseyes_openpifpaf_wholebody.train
    --config /app/bonseyes_openpifpaf_wholebody/train/configs/v3.0_shufflenetv2k16_default_641x641_fp32_config.yml
III. Model Catalog
Bonseyes AI Assets provide specific model nomenclature and directories where pretrained models should be stored using Git LFS (large file system). Also Bonseyes AI Assets provide model summary script for calculating total number of network parameters, number of floating point arithmetics (FLOPs), number of multiply-ads and memory usage.
Models nomenclature and storage
In Bonseyes AI Asset pretrained Pytorch/Tensorflow models should be stored in /<bonseyes_aiasset_name>/model/<pytorch|tensorflow>/<backbone>/<model_name>.<pth|tf> directory as Git LFS.
Here is the example how pretrained model is stored in Bonseyes Openpifpaf Wholebody AI Asset.
Note
Follow Bonseyes guidelines for model file naming, for example Pytorch model can be named as:
v3.0_shufflenetv2k30_default_641x641_fp32where v3.0 refers to tag version, shufflenetv2k30 is backbone name, flag default is for pretrained model from official repository, 641x641 is training input size and fp32 is model precision.
Only pretrained models should be stored in gitlab, while inference engines (ONNXRuntime, TensorRT and torch2trt) shouldn’t be committed to Gitlab repository.
Model summary
Reuse and adjust if needed Bonseyes summary utility script /<bonseyes_aiasset_name>/benchmark/model_summary.py to create pretrained model summary in json file, which contains:
Total number of network parameters
Theoretical amount of floating point arithmetics (FLOPs)
Theoretical amount of multiply-adds (MAdd)
Memory usage
/<bonseyes_aiasset_name>/benchmark/model_summary.py script you can find in AI Asset Container Generator.
In this link you can find /<bonseyes_aiasset_name>/benchmark/model_summary.py in Bonseyes Openpifpaf Wholebody AI Asset.
Here is the example of /<bonseyes_aiasset_name>/benchmark/model_summary.py in Bonseyes Openpifpaf Wholebody AI Asset.
python -m bonseyes_openpifpaf_wholebody.benchmark.model_summary \
    --model-path /app/bonseyes_openpifpaf_wholebody/models/pytorch/shufflenetv2k30/v2.0_shufflenetv2k30_default_641x641_fp32.pkl \
    --engine pytorch \
    --input-size 640x640 \
    --backbone shufflenetv2k30 \
    --json-output /app/
Also, in this link you can find model summaries for multiple models with multiple input sizes in Bonseyes Openpifpaf Wholebody Asset.
IV. Algorithm
Algorithm is important part in every Bonseyes AI Asset which contains complete flow of image processing by model or inference engine. Algorithm components are listed below:
AlgorithmInputclass which structures input
Algorithmclass which contains functions for:
Loading Pytorch/Tensorflow, ONNXRuntime, TensorRT and torch2trt engines
Preprocessing input before passing it to inference engine
Pytorch/Tensorflow, ONNXRuntime, TensorRT and torch2trt inference
Postprocessing inference engines outputs
Inference engine processing which includes running preprocessing, inference and postprocessing functions and calculating their execution times. This function also stores postprocessing output and execution times in concrete form in
AlgorithmResultclass.Rendering which displays postprocessing results on image
Destroying which runs inference engines destructor
AlgorithmResultclass where postprocess output is structured in concrete form. This class stores postprocessing outputs, preprocessing, inference, postprocessing time and latency inresultsdictionary.
Note
Bonseyes AI Assets algorithm examples are provided for image processing, but it can be modified for any kind of input.
AlgorithmInput, Algorithm and AlgorithmResult classes are stored in /<bonseyes_aiasset_name>/algorithm/algorithm.py and they need to inherit BaseAlgorithmInput, BaseAlgorithm and BaseAlgorithmResult abstract classes. In this purpose Bonseyes AI Assets provide BaseAlgorithmInput, BaseAlgorithm and BaseAlgorithmResult abstract classes which are stored in /<bonseyes_aiasset_name>/algorithm/algorithm.py script.
Bonseyes AI Assets also provide LPDNN algorithm which executes LPDNN using HTTP Worker and runs process and render functions.
Bonseyes AI Assets can also provide Challenge Interface integration. Challenge represents problem definition in the techical/interface level and Bonseyes AI Asset implements the defined interface. The goal of the Challenge Interface Integration is that AlgorithmResult output in /<bonseyes_aiasset_name>/algorithm/algorithm.py script should be in the Challenge Interface form which depends from task to task.
All supported tools for algorithm implementation (/<bonseyes_aiasset_name>/algorithm/algorithm_base.py script with abstract algorithm classes, /<bonseyes_aiasset_name>/algorithm/lpdnn_algorithm.py where LPDNNAlgorithm class is defined and /<bonseyes_aiasset_name>/algorithm/algorithm.py script which needs to be implemented) can be found in AI Asset Container Generator. Also, Bonseyes AI Asset provides scripts for some of the steps of the algorithm. For instance, scripts for loading and inferencing ONNXRuntime, TensorRT and torch2trt inference engines can be found in AI Asset Container Generator.
Algorithm classes from /<bonseyes_aiasset_name>/algorithm/algorithm.py script are used in process and benchmark tasks. In image processing case algorithms process and render functions are applied on image, while during video and camera process task they are applied on video frames. During benchmark execution, algorithms process function is ran on every image from validation dataset.
Algorithm base classes
Bonseyes AI Assets provide Algorithm Base classes for structuring algorithm input, model and inference engine loading, processing, rendering and structuring algorithm result.
This script contains BaseAlgorithmInput, BaseAlgorithm and BaseAlgorithmResult abstract classes, which need to be inherited in /<bonseyes_aiasset_name>/algorithm/algorithm.py script.
Here is the example of algorithm_base.py script in AI Asset Container Generator, which needs to be inherited in algorithm.py script. algorithm_base.py script contains:
BaseAlgorithmInputclass, which is used for structuring algorithm input and it needs to be inherited withAlgorithmInputclass.
BaseAlgorithmclass, which is used for loading model, preprocessing, inference, postprocessing and rendering results and it should be inherited withAlgorithmclass.
BaseAlgorithmResultclass, which is used for algorithm result structuring tojson/dictform and it should be inherited withAlgorithmResultclass.
Algorithm inherited classes
Inherit base algorithm classes, defined and implemented in /<bonseyes_aiasset_name>/algorithm/algorithm_base.py, for loading model, processing and rendering.
In this link you can find algorithm script in AI Asset Container Generator.
An example implementing algorithm script with ONNXRuntime and TensorRT inference engines can be found in Bonseyes Openpifpaf Wholebody algorithm.
Another example implementing algorithm script with ONNXRuntime, TensorRT and torch2trt inference engines can also be found in Bonseyes YOLOX algorithm.
Algorithm implementation process:
Implement and use
AlgorithmInputclass by inheriting abstractBaseAlgorithmInputclass for structuring algorithm input. This is optional step and should be used with more complex pipelines. For example if you have a face detector and face landmark detector, algorithm input can be ROI detected by face detector where landmark detector is primary algorithm.Implement and use
Algorithmclass by inheritingBaseAlgorithmclass.In this class you need to implement:
__init__of this class with specifiedmodel_path, engine_type (torch, onnx, tensorrt or torch2trt), input_size, backbone, device (cpu, gpu), thread_numand Bonseyes AI Assets specific arguments.
load_modelfunction, which can load Pytorch/Tensorflow, ONNXRuntime and TensorRT models. You can load also torch2trt models if Pytorch is your starting point model. This function should be called at the end of the__init__ofAlgorithmclass.
preprocessfunction for all inference engines (Pytorch/Tensorflow, ONNXRuntime and TensorRT), which returns preprocessing result. You can load also torch2trt models if Pytorch is your starting point model.
inferfunctions for multiple inference engines (Pytorch, ONNXRuntime, TensorRT and possibly torch2trt). For inference implementation use Bonseyes AI Asset inference engine wrappers in/<bonseyes_aiasset_name>/algorithm/inference_engines/to run inference.inferfunction needs to callinfer_pytorch,infer_onnxruntime,infer_tensorrtorinfer_torch2trtfunctions depending on the engine.Inference engines implementations (ONNXRuntime, TensorRT and torch2trt) can be found in AI Asset Container Generator. This function takes preprocessing output, runs model inference and returns model output.
postprocessingfunction for all inference engines (Pytorch/Tensorflow, ONNXRuntime, TensorRT and potentially torch2trt). This function takes model output from theinferfunction and returns postprocessing output.
processfunction for all inference engines, which needs to run preprocess, inference and postprocess functions, calculate time for their calls and store preprocessing, inference, postprocessing and processing times with postprocessing output toAlgotirhmResultclass. This function takes input image as input and returns result object fromAlgorithmResultclass.
renderfunction, which takes input image and output of process function (AlgorithmResultobject) and applies render on it. The result of this function is rendered image.
destroyfunction, which runs destructor for inference engines (all except Pytorch).Note
You can test
/<bonseyes_aiasset_name>/algorithm/algorithm.pyfunctionalities by running some of the process scripts to se visual results.Implement and use
AlgorithmResultclass by inheritingBaseAlgorithmResultclass to implement algorithm results injson/dictform. Here is the example of this form:self.dict = { "time": { "pre_processing_time": self.pre_processing_time, "infer_time": self.infer_time, "post_processing_time": self.post_processing_time, "processing_time": self.processing_time, }, "items": self.items }Postprocessing outputs are extracted in
self.itemsinAlgorithmResultclass. For example in object detection caseself.itemsis list of dictionaries, where each dictionary represents one prediction and contains keys and values for bbox informations, class name and confidence score. Preprocessing, inference, postprocessing and processing times are init arguments of the class. Also Algorithm postprocess output is init argument of this class.
LPDNN Algorithm
LPDNN Algorithm is used for running process, render and destroy on LPDNN inference engines. It starts AI App by instantiating HTTP worker for specified deployment package. In process function case inputs are sent to POST request and returns the process results.
LPDNN Algorithm class is stored in /<bonseyes_aiasset_name>/algorithm/lpdnn_algorithm.py and it can be found in AI Asset Container Generator.
Implement LPDNNAlgorithm from AI Asset Container Generator by adding code for:
Passing inputs to POST request in process function
Parsing HTTP worker output in process function
Modifying
AlgorithmResultstructure in process function
renderfunction implementation
The example of LPDNN Algorithm you can also find in Bonseyes 3DDFA Asset.
Note
Only process, render and destroy functions of LPDNNAlgorithm class are used. Other functions are not required to be implemented for process and benchmark scripts.
Challenge Interface
Challenge Interface is used for reformating AlgorithmResult classes output to challenge defined format. The Challenge Interface format depends on the task.
Integrate Challenge Interface in /<bonseyes_aiasset_name>/algorithm/ with the following steps:
Add Challenge Interface repository as submodule in
/<bonseyes_aiasset_name>/algorithm/directory. Challenge Interface repositories for different tasks you can find in this link.Here is the example how Challenge Interface can be added as submodule:
cd <bonseyes_aiasset_project_root>
git submodule add ../../../../../../artifacts/challenges/<your_challenge_interface>.git <bonseyes_aiasset_name>/algorithm/challenge_interface
git submodule update --init --recursive <bonseyes_aiasset_name>/algorithm/challenge_interface
This is going to change your
<bonseyes_aiasset_project_root>/.gitmodulesfile. It adds a new submodule information to it.When you run
cd <bonseyes_aiasset_project_root>
cat .gitmodules
.gitmodulesfile should look something like this:[submodule "<bonseyes_aiasset_name>/algorithm/challenge_interface"] path = <bonseyes_aiasset_name>/algorithm/challenge_interface url = ../../../../../../artifacts/challenges/<your_challenge_interface>.gitFor example, Bonseyes Openpifpaf Wholebody AI Asset is using NV-Bodypose2D-BP2D challenge and imports it as submodule in
bonseyes_openpifpaf_wholebody/bonseyes_openpifpaf_wholebody/algorithm/directory.Commands how Challenge Interface is added in Bonseyes Openpifpaf Wholebody AI Asset is:
git submodule add ../../challenges/nv-bodypose2d-bp2d.git bonseyes_openpifpaf_wholebody/algorithm/nv_bodypose2d_bp2d
git submodule update --init --recursive bonseyes_openpifpaf_wholebody/algorithm/nv_bodypose2d_bp2d
The example how this submodule is imported in Bonseyes Openpifpaf Wholebody AI Asset you can find in the following link.
Import Challenge Interface submodule classes in
/<bonseyes_aiasset_name>/algorithm/algorithm.py. Use imported submodule classes and reformatAlgorithmResultoutputs.Here is the example how Challenge Interface classes are imported in Bonseyes Openpifpaf Wholebody AI Asset
/<bonseyes_aiasset_name>/algorithm/algorithm.pyscript:from bonseyes_openpifpaf_wholebody.algorithm.nv_bodypose2d_bp2d.interfaces.NVBodypose2DBP2D_Result import The2DBodyJoints, The2DBoundingBox, NVBodypose2DBP2DResultElementIntegrate challenge result class (for example
NVBodypose2DBP2D_Resultclass) intoAlgorithmResultclass in/<bonseyes_aiasset_name>/algorithm/algorithm.pyand reformat AlgorithmResult output to be list of Challenge Interface Result classes.In this link you can find example how
NVBodypose2DBP2D_Resultclass fromNV-Bodypose2D-BP2Dsubmodule is imported in/bonseyes_openpifpaf_wholebody/algorithm/algorithm.pyand how AlgorithmResult outputs are reformatted as list ofNVBodypose2DBP2DResultElementclass from Challenge Interface.
V. Export
Bonseyes AI Assets provide export tools for different precisions: floating point 32 (fp32) and floating point 16 (fp16) to convert AI model from a training format framework to a deployment format one. Deployment frameworks allow the creation of AI Applications that have lower storage, computation cost and runs more efficiently on the GPU or CPU. Exported engines weights and activations should have certain precision (fp32 or fp16).
Bonseyes AI Assets support models export to fp32 and fp16 precision through two inference engines: ONNXRuntime and TensorRT. Export for GPU deployment can be applied on both TensorRT and ONNXRuntime, while export for CPU deployment can only be applied with ONNXRuntime engine. Further, if a Pytorch model is the starting point, it is also possible to apply models export to fp32 and fp16 precision using torch2trt script directly.
Bonseyes AI Assets also provide export tool for AI App generation and exporting ONNX to LPDNN inference engines (LNE, ONNXRuntime and TensorRT).
Bonseyes tools for ONNXRuntime, TensorRT, torch2trt and LPDNN export can be found in the AI Asset Container Generator.
ONNX export
Bonseyes AI Assets provide ONNXRuntime export tools for Pytorch and TensorFlow/Keras starting point models.
torch2onnx export
Use
/<bonseyes_aiasset_name>/export/torch2onnx.pyto export Pytorch model to ONNX with defined input size (width and height specified as CLI input arguments) and fp32 precision.In this link you can find example of
/<bonseyes_aiasset_name>/export/torch2onnx.pyof the Bonseyes YOLOX Asset.Here is the example of running
/<bonseyes_aiasset_name>/export/torch2onnx.pyscript of Bonseyes YOLOX Asset:python -m bonseyes_yolox.export.torch2onnx \ --model-input /app/bonseyes_yolox/models/pytorch/yolox_s/v1.0_yolox_s_default_640x640_fp32.pth \ --model-output /app/bonseyes_yolox/models/onnx/yolox_s/v1.0_yolox_s_default_640x640_fp32.onnx \ --input-width 640 \ --input-height 640or you can run
/<bonseyes_aiasset_name>/export/all.pyscript withengineonnxruntime.python -m bonseyes_yolox.export.all \ --precisions fp32 \ --input-sizes 640x640 \ --engine onnxruntime \ --backbone yolox_s
Exported ONNXRuntime model should be saved in
/<bonseyes_aiasset_name>/models/onnx/{args.backbone}/directory and should be named as:v1.0_yolox_s_default_640x640_fp32.onnxwhere
v1.0is version,yolox_sis backbone_name,defaultis that it is exported from pretrained Pytorch model,640x640is input size andfp32is precision.
tf2onnx export
Tensorflow/Keras as the staring point model can be used, but is not officially supported in the AI Asset. In
/<bonseyes_aiasset_name>/export/tf2onnx.pyyou can find script for Keras.h5model export to ONNXRuntime.Add
tensorflow(tf-2.0 or newer) andtf2onnx(tf2onnx-1.8.4 or newer) with their versions insetup.pyand install them during building image.Use
/<bonseyes_aiasset_name>/export/tf2onnx.pyto export Tensorflow/Keras model to ONNX with specified input and output model and input size (width and height specified as CLI input arguments) and fp32 precision.Here is the example of running
/<bonseyes_aiasset_name>/export/tf2onnx.pyscript:python3 -m <bonseyes_aiasset_name>.export.tf2onnx \ --model-input /path/to/h5/model \ --model-output /path/to/output/onnx/model \ --input-width /input/width/ \ --input-height /input/height/Add a subprocess call of
/<bonseyes_aiasset_name>/export/tf2onnx.pyin ONNXRuntime case in/<bonseyes_aiasset_name>/export/all.pyscript.Exported ONNXRuntime model should be saved in
/<bonseyes_aiasset_name>/models/onnx/{args.backbone}/directory. Here is the example how exported model should be named:v1.0_yolox_s_default_640x640_fp32.onnxwhere
v1.0is version,yolox_sis backbone_name,defaultis added as it comes from a pretrained model from official repository,640x640is input size andfp32is precision.
TensorRT export
Use
/<bonseyes_aiasset_name>/export/onnx2trt.pyto export ONNX model to TensorRT with precisions fp16 or fp32.In this link you can find example of
/<bonseyes_aiasset_name>/export/onnx2trt.pyof the Bonseyes YOLOX Asset.Here is the example of running
/<bonseyes_aiasset_name>/export/onnx2trt.pyscript in Bonseyes YOLOX Asset:python -m bonseyes_yolox.export.onnx2trt \ --onnx-model /app/bonseyes_yolox/models/onnx/yolox_s/v1.0_yolox_s_default_640x640_fp32.onnx \ --output-dir /app/bonseyes_yolox/models/tensorrt/Tesla_T4/yolox_s \ --precision fp32or you can run
/<bonseyes_aiasset_name>/export.allscript withenginetensorrt. Specifyprecisionto be fp32 or fp16 or add both precisions in CLI argument. Example of runningonnx2trtexport to fp16 and fp32 throughexport.allscript in Bonseyes YOLOX Asset is the following:python -m bonseyes_yolox.export.all \ --precisions fp32 fp16 \ --input-sizes 640x640 \ --engine tensorrt \ --backbone yolox_s
Exported TensorRT model should be saved in
/<bonseyes_aiasset_name>/models/tensorrt/{gpu_name}/{args.backbone}directory and should be named as one of the following models:v1.0_yolox_s_default_640x640_fp32_dla_disabled.trt v1.0_yolox_s_default_640x640_fp32_dla_enabled.trt v1.0_yolox_s_default_640x640_fp16_dla_disabled.trt v1.0_yolox_s_default_640x640_fp16_dla_enabled.trtwhere
v1.0is version,yolox_sis backbone_name,defaultis that it is exported from ONNX model, which is exported from pretrained Pytorch model,640x640is input size,fp32precision anddla_enabledordla_disabledis information that about enabling DLA during export.
torch2trt export
Make sure you added
torch2trtinstallation inDockerfile.cudaforx86andjetsonand installed torch2trt.To install torch2trt, you need to add
RUN cd /tmp && git clone https://github.com/NVIDIA-AI-IOT/torch2trt \
    && cd torch2trt \
    && git checkout 0400b38123d01cc845364870bdf0a0044ea2b3b2 \
    && wget https://github.com/NVIDIA-AI-IOT/torch2trt/commit/8b9fb46ddbe99c2ddf3f1ed148c97435cbeb8fd3.patch \
    && git apply 8b9fb46ddbe99c2ddf3f1ed148c97435cbeb8fd3.patch \
    && python3 setup.py install --user
in
/<bonseyes_aiasset_name>/docker/platforms/x86_64/Dockerfile.cudaand/<bonseyes_aiasset_name>/docker/platforms/nvidia_jetson/Dockerfile.cudaafter setup AI Asset.Example of
torch2trtinstallation inDockerfile.cudaforx86on Bonseyes YOLOX you can find on this link.Example of this installation you can find in AI Asset Container Generator.
Use
/<bonseyes_aiasset_name>/export/torch2trt.pyto export Pytorch model to TensorRT with precisions fp16 or fp32. It is also possible to use theuse-onnxCLI argument during calling this script where torch2trt converts Pytorch model to ONNX first, and then exports the resulted ONNX to TensorRT model with fp32 or fp16 precision.In this link you can find example of
/<bonseyes_aiasset_name>/export/torch2trt.pyof the Bonseyes YOLOX Asset.Here is the example of running
export/torch2trt.pyscript in Bonseyes YOLOX Asset:python3 -m bonseyes_yolox.export.torch2trt \ --input-path /app/bonseyes_yolox/models/pytorch/yolox_s/v1.0_yolox_s_default_640x640_fp32.pth \ --output-dir /app/ \ --precision fp32 \ --input-width 640 \ --input-height 640or you can run
/<bonseyes_aiasset_name>/export/all.pyscript withenginetorch2trt. Specifyprecisionto be fp32 or fp16 or add both precisions in CLI argument.python -m bonseyes_yolox.export.all \ --precisions fp32 fp16 \ --input-sizes 640x640 \ --engine torch2trt \ --backbone yolox_sNote
Note that
/<bonseyes_aiasset_name>/export/all.pyscript exports 2 torch2trt models:
Converting Pytorch to ONNX and then exporting to TensorRT and
Directly exporting TensorRT model from Pytorch
Exported torch2trt model should be saved in
/<bonseyes_aiasset_name>/models/torch2trt/{gpu_name}/{args.backbone}directory.Note
After torch2trt export, two torch2trt optimized models are saved in
/<bonseyes_aiasset_name>/models/torch2trt/{gpu_name}/{args.backbone}, where one has.pthextension (Python) and another has.engineextension (tensorRT) and is used in C++. In the given example the exported.pthmodel is imported for inference. More information about loading and inferencing torch2trt models can be found in AI Asset Container Generatortorch2trt models with
.pthextension, which are exported directly from Pytorch to TensorRT are named with one of the following names:v1.0_yolox_s_default_640x640_fp32_dla_disabled_trt.pth v1.0_yolox_s_default_640x640_fp16_dla_disabled_trt.pth v1.0_yolox_s_default_640x640_fp32_dla_enabled_trt.pth v1.0_yolox_s_default_640x640_fp32_dla_enabled_trt.pthwhere
v1.0is version,yolox_sis backbone_name,defaultis that it is exported from pretrained Pytorch model,640x640is input size,fp32precision anddla_enabledordla_disabledis information about enabling DLA during export.torch2trt models with
.pthextension, which are exported from Pytorch to ONNX and then from ONNX to TensorRT are named with one of the following names:v1.0_yolox_s_default_640x640_fp32_dla_disabled_with_onnx_trt.pth v1.0_yolox_s_default_640x640_fp16_dla_disabled_with_onnx_trt.pth v1.0_yolox_s_default_640x640_fp32_dla_enabled_with_onnx_trt.pth v1.0_yolox_s_default_640x640_fp32_dla_enabled_with_onnx_trt.pthwhere
v1.0is version,yolox_sis backbone_name,defaultis that it is exported from pretrained Pytorch model,640x640is input size,fp32precision,dla_enabledordla_disabled, which signs that DLA is enabled or disabled during export and_with_onnxis that model is exported from Pytorch to ONNX and then from ONNX to TensorRT.
onnx2lpdnn export
For onnx2lpdnn export add following dependencies:
Use
/<bonseyes_aiasset_name>/export/onnx2lpdnn.pyto generate AI App and export ONNX model to LPDNN inference engines (LNE, ONNXRuntime or TensorRT) with precisions fp32 or fp16.You can find
/<bonseyes_aiasset_name>/export/onnx2lpdnn.pyin AI Asset Container Generator export directory. This script uses algorithm, challenge and deployment yaml files, which are stored inlpdnndirectory and can be found in AI Asset Container Generator.In this link you can find example of
/<bonseyes_aiasset_name>/export/onnx2lpdnn.pyscript in the Bonseyes 3DDFA Asset.Here is the example of running
/<bonseyes_aiasset_name>/export/onnx2lpdnn.pyscript in Bonseyes 3DDFA Asset:python bonseyes_3ddfa_v2/export/onnx2lpdnn.py \ --engine onnxruntime \ --precision F32 \ --algorithm-file bonseyes_3ddfa_v2/lpdnn/catalog/mobilenetv1-default-120x120-fp32/algorithm.yml \ --challenge-file bonseyes_3ddfa_v2/lpdnn/challenge/challenge.yml \ --deployment-file bonseyes_3ddfa_v2/lpdnn/deployment/deployment-file.yml \ --deployment-package x86_64-ubuntu20_cuda \ --output-dir build/3dface-landmarks-v1.0-mobilenetv1-120x120By running
/<bonseyes_aiasset_name>/export/onnx2lpdnn.pyyou need to specify algorithm, challenge and deployment yaml files.More information about LPDNN’s YAML files you can be found in Create LPDNN’s file tree and about the available engines in LDPNN’s Inference engines.
Exported models and additional files should be saved in the directory you specified with
output-dirCLI argument.
All export
Use /<bonseyes_aiasset_name>/export/all.py to export to ONNXRuntime, TensorRT, torch2trt or to all engines with specified precision(s), backbone name, input sizes, ONNX opset version (optional) and enable DLA flag (optional).
In this link you can find an example of export all.py of the Bonseyes YOLOX Asset. Also you can find export all script in AI Asset Container Generator.
Here is the example of running /<bonseyes_aiasset_name>/export/all.py script with all engines:
python -m bonseyes_yolox.export.all \
    --precisions fp32 fp16 \
    --input-sizes 640x640 \
    --engine all \
    --backbone yolox_s
Warning
- Potential export issues and fixes:
If you have problem with exporting Pytorch to ONNX model, try changing opset version.
Note that you can only export TensorRT model with specific input size from existing ONNX model with the same input size (input size of the model will be written in exported ONNX models name).
You can set enable-dla CLI argument to True when calling
/<bonseyes_aiasset_name>/export/all.pyscript or/<bonseyes_aiasset_name>/export/onnx2trt.pyon JetsonXavier AGX or JetsonXavier NX devices. This flag is enabling Deep Learning Accelerator and it can be used (stored to True) only on JetsonXavier AGX and JetsonXavier NX devices. On other devices or Server you shouldn’t set it to True.Try changing workspace size when calling
/<bonseyes_aiasset_name>/export/all.pyscript or/<bonseyes_aiasset_name>/export/onnx2trt.pyscript to manage how much GPU memory is TensorRT using during export (this can be useful when you are working on edge devices that have low memory).
VI. Optimize
Bonseyes AI Assets provide optimisation methods such as Post-training Quantization (PTQ) and Quantization-aware Training (QAT) to reduce the memory footprint and improve the efficiency of DNNs. Quantization is a compression method that reduces the storage cost of a variable by employing reduced-numerical precision. This improves the arithmetic intensity of neural network inference by increasing the amount of computational work that can be performed for a given amount of memory traffic.
Post Training Quantization (PTQ)
Bonseyes AI Assets supports post-training quantization for both weights and activations. Weights can be directly quantized to 8-bit integer while the activations require a validation set to determine their dynamic range. PTQ methods usually applied layer fusion of the Bnorm layers by folding them back into the previous convolutions before quantizing the weights and activations, which might lead to small drops in accuracy in some cases.
Bonseyes AI Assets provide PTQ through two inference engines: ONNXRuntime and TensorRT. PTQ for GPU deployment can be applied on both TensorRT and ONNXRuntime, while PTQ for CPU deployment can only be applied with ONNXRuntime engine. Further, if a Pytorch model is the starting point, it is also possible to apply Post Training Quantization using torch2trt script directly.
Bonseyes optimization tools for ONNXRuntime, TensorRT and torch2trt Post Training Quantization can be found in the AI Asset Container Generator to optimize exported models (apply Post Training Quantization).
PTQ requires a callibration dataset to adjust the DNN’s activations’ range so as to calculate the activation’ scale and offset and retain a high amount of accuracy. Hence, the first step of PTQ is to implement a calibration_dataloader function in /<bonseyes_aiasset_name>/optimize/post_training_quantization/calibration_data.py to provide data sample for int8 quantization (add default model path and validation images path as function arguments). Also in this script you can specify default input size and number of images, which are used for int8 calibration.
TensorRT PTQ
Use
INT8Calibratorcalibrator class in/<bonseyes_aiasset_name>/optimize/post_training_quantization/trt_quantize.pyto perform int8 post training quantization with TensorRT (you can specify number of images in main() when callingcalibration_dataloaderfunction and you can specify batch size when callingINT8Calibrator classalso in main())Use
/<bonseyes_aiasset_name>/optimize/post_training_quantization/trt_quantize.pyto optimize TensorRT model to int8 precision. Specify ONNX fp32 model path when running this script.In this link you can find example of
trt_quantize.pyscript in BonseyesYOLOX.Here is the example of running
trt_quantize.pyscript:python3 -m bonseyes_yolox.optimize.post_training_quantization.trt_quantize \ --onnx-model /app/bonseyes_yolox/models/onnx/yolox_s/v1.0_yolox_s_default_640x640_fp32.onnx \ --output-dir /app/bonseyes_yolox/models/tensorrt/Tesla_T4/yolox_s/or you can run
/<bonseyes_aiasset_name>/optimize/post_training_quantization/all.pyscript withenginetensorrtpython -m bonseyes_yolox.optimize.post_training_quantization.all \ --engine tensorrt \ --backbone yolox_s \ --input-sizes 640x640
Optimized TensorRT model using PTQ should be saved in
/<bonseyes_aiasset_name>/models/tensorrt/{gpu_name}/{args.backbone}directory and should be named as one of the following models:v1.0_yolox_s_default_640x640_int8_dla_disabled.trt v1.0_yolox_s_default_640x640_int8_dla_enabled.trtwhere
v1.0is version,yolox_sis backbone_name,defaultfor optimized model coming from ONNX model, that in turn, is exported from official pretrained Pytorch model,640x640is input size,int8precision anddla_enabledordla_disabledis information about enabling DLA during optimization process.
ONNXRuntime PTQ
Make sure to have simplified and optimised the ONNX model by using the functions in
/<bonseyes_aiasset_name>/export/torch2onnx.py.Use
DataReadercalibrator class in/<bonseyes_aiasset_name>/optimize/post_training_quantization/onnx_quantize.pyto perform int8 post training quantization with ONNX (you can specify number of images in main() when callingDataReaderclass). Add default value ofcalibrate-datasetCLI argument to be path to validation dataset images directory.Use
/<bonseyes_aiasset_name>/optimize/post_training_quantization/onnx_quantize.pyto optimize ONNX model to int8 precision.In this link you can find example of
onnx_quantize.pyin BonesyesYOLOX case.Here is the example of running
onnx_quantize.pyscript:python3 -m bonseyes_yolox.optimize.post_training_quantization.onnx_quantize \ --input-model /app/bonseyes_yolox/models/onnx/yolox_s/v1.0_yolox_s_default_640x640_fp32.onnx \ --output-model /app/bonseyes_yolox/models/onnx/yolox_s/v1.0_yolox_s_default_640x640_int8.onnxor you can run
/<bonseyes_aiasset_name>/optimize/post_training_quantization/all.pyscript withengineonnxruntimepython -m bonseyes_yolox.optimize.post_training_quantization.all \ --engine onnxruntime \ --backbone yolox_s \ --input-sizes 640x640
Optimized ONNXRuntime model should be saved in
/<bonseyes_aiasset_name>/models/onnx/{args.backbone}/directory and should be named as:v1.0_yolox_s_default_640x640_int8.onnxwhere
v1.0is version,yolox_sis backbone_name,defaultfor optimized from ONNX model, which is exported from pretrained Pytorch model,640x640is input size andint8is precision.
torch2trt PTQ
Make sure you added
torch2trtinstallation inDockerfile.cudaforx86andjetsonand installed torch2trt.To install torch2trt, you need to add
RUN cd /tmp && git clone https://github.com/NVIDIA-AI-IOT/torch2trt \
    && cd torch2trt \
    && git checkout 0400b38123d01cc845364870bdf0a0044ea2b3b2 \
    && wget https://github.com/NVIDIA-AI-IOT/torch2trt/commit/8b9fb46ddbe99c2ddf3f1ed148c97435cbeb8fd3.patch \
    && git apply 8b9fb46ddbe99c2ddf3f1ed148c97435cbeb8fd3.patch \
    && python3 setup.py install --user
in
/<bonseyes_aiasset_name>/docker/platforms/x86_64/Dockerfile.cudaand/<bonseyes_aiasset_name>/docker/platforms/nvidia_jetson/Dockerfile.cudaafter setup AI Asset.Example of
torch2trtinstallation inDockerfile.cudaforx86on Bonseyes YOLOX you can find on this link.Example of this installation you can find in AI Asset Container Generator.
Use
calibration_dataloaderfunction in/<bonseyes_aiasset_name>/optimize/post_training_quantization/calibration_data.pyto provide data sample for int8 quantizationUse
/<bonseyes_aiasset_name>/optimize/post_training_quantization/torch2trt_quantize.pyto optimize torch2trt model withint8precision from Pytorch model. It is also possible to use theuse-onnxCLI argument during calling this script where torch2trt converts Pytorch model to ONNX first, and then optimizes the resulted ONNX to TensorRT int8 model.In this link you can find example of
torch2trt_quantize.pyin BonesyesYOLOX caseHere is the example of running
torch2trt_quantize.pyscript:python3 -m bonseyes_yolox.optimize.post_training_quantization.torch2trt_quantize \ --pth-model /app/bonseyes_yolox/models/pytorch/yolox_s/v1.0_yolox_s_default_640x640_fp32.pth \ --output-dir /app/bonseyes_yolox/models/torch2trt/Tesla_T4/yolox_s/ \ --input-width 640 \ --input-height 640or you can run
/<bonseyes_aiasset_name>/optimize/post_training_quantization/all.pyscript withenginetorch2trtpython -m bonseyes_yolox.optimize.post_training_quantization.all \ --engine torch2trt \ --backbone yolox_s \ --input-sizes 640x640Note
Note that
/<bonseyes_aiasset_name>/optimize/post_training_quantization/all.pyscript optimizes 2 torch2trt models:
Converting Pytorch to ONNX and then optimizing to TensorRT and
Directly optimizing TensorRT model from Pytorch.
Optimized torch2trt models should be saved in
/<bonseyes_aiasset_name>/models/torch2trt/{gpu_name}/{args.backbone}directory.Note
After torch2trt PTQ, two torch2trt optimized models are saved in
/<bonseyes_aiasset_name>/models/torch2trt/{gpu_name}/{args.backbone}, where one has.pthextension (Python) and another has.engineextension (tensorRT) and is used in C++. In the given example the optimised.pthmodel is imported for inference. More information about loading and inferencing torch2trt models can be found in AI Asset Container Generatortorch2trt models with
.pthextension, which are directly optimized (PTQ) from Pytorch to TensorRT are named with one of the following names:v1.0_yolox_s_default_640x640_int8_dla_disabled_trt.pth v1.0_yolox_s_default_640x640_int8_dla_enabled_trt.pthwhere
v1.0is version,yolox_sis backbone_name,defaultis that it is optimized from pretrained Pytorch model,640x640is input size,int8precision anddla_enabledordla_disabledis information that about enabling DLA during optimization process.torch2trt models with
.pthextension, which are exported from Pytorch to ONNX and then optimized from ONNX to TensorRT are named with one of the following names:v1.0_yolox_s_default_640x640_int8_dla_disabled_with_onnx_trt.pth v1.0_yolox_s_default_640x640_int8_dla_enabled_with_onnx_trt.pthwhere
v1.0is version,yolox_sis backbone_name,defaultis that it is optimized from pretrained Pytorch model,640x640is input size,int8precision,dla_enabledordla_disabled, which signs that DLA is enabled or disabled during optimization process and_with_onnxis that model is exported from Pytorch to ONNX and then optimized from ONNX to TensorRT.
LPDNN PTQ
LPDNN supports Post Training Quantization for its inference engines (TensorRT, ONNXRuntime, NCNN and LNE).
Instructions for LPDNN Post Training Quantization can be found on Quantization workflow for LPDNN’s engines .
All PTQ
Use /<bonseyes_aiasset_name>/optimize/post_training_quantization/all.py to optimize TensorRT, ONNXRuntime, torch2trt or all models with specified input sizes, backbone name, calibration dataset and tag version. Also, make sure that you added validation image’s folder path as calibrate-dataset CLI argument.
In this link you can find PTQ all.py example in BonseyesYOLOX.
Here is the example of running post_training_quantization/all.py script:
python -m bonseyes_yolox.optimize.post_training_quantization.all \
    --engine all \
    --backbone yolox_s \
    --input-sizes 640x640
Warning
- Potential optimize issues and fixes:
If the quantization process is killed, there is a chance that too many images are used for optimization and device doesn’t have memory for this operation. Try changing
images_numargument to lower number of images used when calling calibration_dataloader function in main part of/<bonseyes_aiasset_name>/optimize/post_training_quantization/trt_quantize.pyscript for TensorRT and changecalibration_images_numargument while calling DataReader in main part of the/<bonseyes_aiasset_name>/optimize/post_training_quantization/onnx_quantize.pyscript for ONNX. The lower the images_num the smaller will be AP (be careful to not set very small images number - it is recommended to set images_num argument from 100).TensorRT optimized model is made from ONNX fp32 model, so if one wants to optimize TensorRT model with specific input size, ONNX fp32 model with that specific input size must already exist (if not then convert Pytorch model to ONNX fp32 model with that specific input size)
enable-dla CLI argument can be set to True when calling
/<bonseyes_aiasset_name>/optimizepost_training_quantization/all.pyscript or/<bonseyes_aiasset_name>/optimize/post_training_quantization/trt_quantize.pyon JetsonXavier AGX or JetsonXavier NX. This flag is enabling Deep Learning Accelerator and it can be used (stored to True) only on JetsonXavier AGX and JetsonXavier NX devices. On other devices or Server you shouldn’t set it to True.Try changing workspace size when calling
/<bonseyes_aiasset_name>/optimize/post_training_quantization/all.pyscript or/<bonseyes_aiasset_name>/optimize/post_training_quantization/trt_quantize.pyscript to manage how much GPU memory is TensorRT using during quantization process (this can be useful when we are working on edge devices, which have low memory).
Quantization Aware Training (QAT)
PTQ might lead to a drop in accuracy when quantizing from fp32 to int8 formats. The goal of QAT is to recover the accuracy of the int8 models by fine-tuning the model weights while the quantization is performed.
In QAT, models are fine-tuned in Pytorch by simulating a quantization fordward pass, i.e., fake quantization, and updating the weights during the backward pass. Thereby, the model is re-trained, increasing the precision of the fake quantized model. After fine-tuning Pytorch models need to be exported to fake quantized ONNX models and finally explicit quantization needs to be applied from fake quantized ONNX to int8 using TensorRT functions.
QAT Tools
The following tools are used for QAT:
Bonseyes optimization tool to calibrate data for QAT. This tool can be found in the container generator
The
pytorch_quantizationpackage is used for QAT within the PyTorch training framework:pytorch_quantizationpackage is used for QAT process and export fake quantized Pytorch modelº.For
pytorch_quantizationinstallation you need to have installedpytorch==1.10andtorchvision==0.11We need to install pytorch_quantizaton 2.1.2 and for
x86you need to addpytorch_quantizationinstallation by addingRUN cd /tmp && \ gdown https://developer.download.nvidia.com/compute/redist/pytorch-quantization/pytorch_quantization-2.1.2-cp38-cp38-linux_x86_64.whl && \ python3 -m pip install prettytable==3.2.0 pytorch_quantization-2.1.2-cp38-cp38-linux_x86_64.whl sphinx-glpi-theme==0.3 wcwidth==0.2.5 && \ sudo rm -rf /tmp/* ; \
in
/<bonseyes_aiasset_name>/docker/platforms/x86_64/Dockerfile.cudaafter setup AI AssetExample of
pytorch_quantizationinstallation inDockerfile.cudaforx86on YOLOX you can find on this link. The example ofpytorch_quantizationinstallation you can also find in container generatorOn jetson devices it is not possible to install
pytorch_quantizationpackage since this package is only supported onx86. On jetson devices, it is only possible to start from the following step.
torch2onnx.py and onnx2trt.py scripts to convert fake-quantized Pytorch models to ONNX model and TensorRT models, i.e., explicit quantization, after the QAT process (**
qatflag needs to be set**).
QAT process
Change the training code
Change config file for running training (add
qatbool flag in config, which will be sent to training code). Here you can see config file example for Quantization Aware Training, as you can see there isqatflag enabled:device: loader-workers: 4 gpu_num: 4 hyperparams: fp16: True #Addopting mix precision training qat: True resume: False #resume training cache: False #caching imgs to RAM for fast training occupy: False #occupy GPU memory first for training experiment-name: yolox_s #experiment name name: 'yolox-s' dist-backend: 'nccl' #distributed backend dist-url: 'auto' #url used to set up distributed training batch-size: 16 devices: 1 #number of GPUs 8 in their example for training exp_file: None #experiment description file ckpt: /app/bonseyes_yolox/models/pytorch/yolox_s/v1.0_yolox_s_default_640x640_fp32.pth # checkpoint file start_epoch: None #resume training start epoch num_machines: 1 #num of node for training machine_rank: 0 #node rank for multi-node training logger: tensorboard #local rank for dist training system: output: "/app/source/yolox/YOLOX_outputs/yolox_s/train_log.txt"
In this link you can find YOLOX config example for QAT.
You can also find train/__main__.py script, which runs AI Asset training script.
First, you need to add QAT case in your training code (add
qatargument in training CLI, which will be set to True ifqatflag in config is True).Before loading model initialize quant modules by adding:
from pytorch_quantization import quant_modules
quant_modules.initialize()
which signals Pytorch to use fake quantized layers instead of default layers (for example it uses QuantConv2D layer instead of Conv2D layer), which simulates quantization forward pass.
Note
Using
quant_modules.initialize()we apply automatic fake quantization on layers. If you want only custom layers to be fake quantized, you can useQuantDescriptorand define which layers should be fake quantized. Here is example how to add custom fake quantized layer (in this case Conv2D and QuantMaxPool2D):from pytorch_quantization import nn as quant_nn from pytorch_quantization.tensor_quant import QuantDescriptor quant_desc_input = QuantDescriptor(calib_method=calibrator) quant_nn.QuantConv2d.set_default_quant_desc_input(quant_desc_input) quant_nn.QuantMaxPool2d.set_default_quant_desc_input(quant_desc_input)
Get model and then load pretrained models state dict.
If you are working with Pytorch model, calibrate loaded model by importing
/<bonseyes_aiasset_name>/optimize/quantization_aware_training/calibrate_data.pyto your training code and applycalibrate_modelfunction to your model in training code. Use training dataset to calibrate model.from bonseyes_yolox.optimize.quantization_aware_training.calibrate_data import calibrate_model if self.args.qat and not self.calibrated: # Calibrate the model using max calibration technique. with torch.no_grad(): calibrate_model( model=model, model_name="yolox", data_loader=self.train_loader, num_calib_batch=64, calibrator=calibrator, hist_percentile=[99.9, 99.99, 99.999, 99.9999], out_dir="./", batch_size=self.args.batch_size) self.calibrated = True
Fine tune model (the rest of the code for training is the same as code for default training) with lower learning rate, lower number of iterations and low number of epochs (add case with
qatflag for hyperparameters set up).After fine tuning is done, save fine-tuned model in
/<bonseyes_aiasset_name>/models/pytorch_qat/<backbone_name>/directory, name of fine-tuned model differs from pretrained model without QAT by replacingdefaultword in Pytorch model withqatExample for running training script:python3 -m bonseyes_yolox.train --config /app/bonseyes_yolox/train/configs/v1.0_yolox_s_qat_640x640_fp32_config.yml
In this link you can see modified source training code of YOLOX with added QAT feature in it.
Use
/<bonseyes_aiasset_name>/export/torch2onnx.pyto export fine tuned QAT Pytorch model with fake quantized layers to ONNX with defined input size (width and height specified as CLI input arguments). ONNX model should have Quantize and Dequantize Layers added in it.torch2onnxscript with--qatflag exports fake quantized Pytorch model to ONNX model with Quantize and Dequantize layers. You should useopset 13for applying export to ONNX with fake quantized layers. You can also use<bonseyes_aiasset_name>/export/all.pywith argument--qatto export Pytorch model to fake quantized ONNX. You can runtorch2onnx.pyscript directly:python -m bonseyes_yolox.export.torch2onnx \ --model-input /app/bonseyes_yolox/models/pytorch_qat/yolox_s/v1.0_yolox_s_qat_640x640_fp32.pth \ --model-output /app/bonseyes_yolox/models/onnx/yolox_s/v1.0_yolox_s_qat_640x640_fp32.onnx \ --input-width 640 \ --input-height 640 \ --qat
or you can run it using
export/all.pyscript:python -m bonseyes_yolox.export.all \ --precisions fp32 \ --input-sizes 640x640 \ --engine onnxruntime \ --backbone yolox_s \ --qat
Use
/<bonseyes_aiasset_name>/export/onnx2trt.pyto apply explicit quantization from fake quantized ONNX fp32 model to TensorRT model with int8 precision. Specify fake quantized ONNX fp32 model path when running this script. SetqatCLI argument toTrueandprecisiontoint8to apply explicit quantization:python -m bonseyes_yolox.export.onnx2trt \ --onnx-model /app/bonseyes_yolox/models/onnx/yolox_s/v1.0_yolox_s_qat_640x640_fp32.onnx \ --output-dir /app/bonseyes_yolox/models/tensorrt/{gpu_name}/{args.backbone} \ --precision int8 \ --qat
or you can run it using
export/all.pyscript:python -m bonseyes_yolox.export.all \ --precisions int8 \ --input-sizes 640x640 \ --engine tensorrt \ --backbone yolox_s \ --qat
Note
For explicit quantization you don’t need calibration dataset since calibration is applied in Quantization Aware Training process.
In this link you can find BonseyesYOLOX export folder where you can see examples of
all.py,torch2onnx.pyandonnx2trt.pyscripts.Apply benchmark on TensorRT explicit quantized model after QAT process:
python3 -m bonseyes_yolox.benchmark.all \
    --input-size 640x640 \
    --dataset all \
    --device gpu \
    --backbone yolox_s \
    --engine tensorrt
Note that
/<bonseyes_aiasset_name>/benchmark/all.pyscript is not applied on ONNX qat model because it is only used for explicit quantization. New version with this addition you can find on template generatorAfter applying benchmark you should add QAT models in
/<bonseyes_aiasset_name>/benchmark/generate_graphs.pyscript. You can find example for adding QAT models in graph in YOLOX generate_graphs.py
Pytorch model after Quantization Aware Training should be saved in /<bonseyes_aiasset_name>/models/pytorch_qat/<backbone_name>/ directory and the name of Pytorch QAT model should be as following:
v1.0_yolox_s_qat_640x640_fp32.pth
where v1.0 refers to tag version, yolox_s is backbone name, flag qat is for fine-tuned model after Quantization Aware Training, 640x640 is training input size and fp32 is model precision.
Exported ONNX model from Pytorch QAT model should be stored in /<bonseyes_aiasset_name>/models/onnx/<backbone_name>/ directory and the name of this ONNX model should be as following:
v1.0_yolox_s_qat_640x640_int8.onnx
TensorRT int8 model after applying explicit quantization from the fake quantized ONNX model should be stored in /<bonseyes_aiasset_name>/models/tensorrt/<GPU_name>/<backbone_name>/ directory and the name of this TensorRT model should be as following:
v1.0_yolox_s_qat_640x640_int8_dla_disabled.trt
Warning
- Potential QAT problems and fixes:
Number of iterations should be very low (for example 20 iterations), learning rate should be very low (around 1% or lower of default learning rate for training), number of epochs should also be very low (couple of epochs). Choose the best hyperparameter values experimentally.
You can do only Pytorch to ONNX export with opset 13 because lower opset versions doesn’t support fake quantized layers.
After export to ONNX, check ONNX model in Netron. You should see that Quantize and Dequantize layers are added to the model.
You need calibration dataset, which is training dataset, only when you are training model with Quantization Aware Training. When you are applying export from Pytorch to ONNX or from ONNX to TensorRT you don’t need calibration dataset since it is applying explicit quantization.
Pytorch and ONNX models after Quantization Aware Training have fp32 precision, but TensorRT has int8 precision. When applying explicit quantization TensorRT only applies quantization and layer fusion on layer blocks, which are between Quantize and Dequantize layers in ONNX model.
We are only using TensorRT quantized model for benchmarking since other models have fp32 precision and ONNX model has additional layers, which decrease model inference.
After whole process is successfully done, compare PTQ and QAT TensorRT int8 models precision and inference time (TensorRT QAT int8 model should have higher precision than PTQ TensorRT int8 model).
VII. Process
Bonseyes AI Assets provide tools to process, i.e., infer, an AI model taking input data in several formats (input file, video, or camera stream and HTTP worker), using all available inference engines (Pytorch, ONNXRuntime, TensorRT and LPDNN) with all available precisions (fp32, fp16 and int8).
Besides, if a Pytorch model is the starting point, it is possible to apply process using torch2trt inference engine with fp32, fp16 and int8 precisions. Devices that have Nvidia GPU and CPU support can process an input with all inference engines, while those devices only featuring a CPU can process the input with ONNXRuntime and LPDNN inference engine.
Bonseyes process tools for image, video, camera and client-server, including LPDNN process can be found in the AI Asset Container Generator.
Next, we describe the arguments that need to be used for pytorch, onnxruntime and tensorrt standalone engines. For LPDNN processing, refer to LPDNN process.
Image Process
The image-based process takes an input file and infers the AI model on it.
The image processing script in
/<bonseyes_aiasset_name>/process/image.pyis used to process an input image. This script loads image or image folder, which need to be in.jpgformat, instantiates an Algorithm class to process and render the image and finally outputs to a json file.In this link you can find example of
image.pyprocess image script in Bonseyes Openpifpaf Wholebody.Here is the example of running
image.pyscript:# user@docker:/app$ python -m bonseyes_openpifpaf_wholebody.process.image \ --model /app/bonseyes_openpifpaf_wholebody/models/pytorch/shufflenetv2k30/v2.0_shufflenetv2k30_default_641x641_fp32.pkl \ --input-size 641x641 \ --engine pytorch \ --jpg-input /app/bonseyes_openpifpaf_wholebody/process/demo/samples/image/test/demo_image_1.jpg \ --jpg-output /app/ \ --json-output /app/ \ --logo \ --device gpuProcessed
jpgimage is saved in file or directory, which is defined withjpg-outputCLI argument. Ifjbg-outputis path to directory where processed image needs to be saved, the name of the processed image is the same as the name of the input image withprocessed_prefix added to original image name. For example ifjpg-outputis path to directory and input image istraffic.jpg, processed image will be saved asprocessed_traffic.jpgin specified directory.
jsonfile with image predictions will be saved in file or directory, which is defined withjson-outputCLI argument. Ifjson-outputis path to directory where processed image needs to be saved, the name of the json file is the same as the name of processed image. For example ifjson-outputis path to directory and input image istraffic.jpg, json file will be saved asprocessed_traffic.jsonin specified directory withjson-outputCLI argument.Note
Image has to be in
.jpgformat.Warning
If selected docker image does not have CUDA support, replace
--device gpuwith--device cpu
Video Process
The video-based process takes a video as input and infers the AI model on it.
The video processing script in
/<bonseyes_aiasset_name>/process/video.pyis used to process an input video. This script loads video file, which needs to be in.mp4format, instantiates an Algorithm class to process and render the video and finally outputs to ajsonandcsvfiles.In this link you can find example of
video.pyprocess video script in Bonseyes Openpifpaf Wholebody.Here is the example of running
video.pyscript:# user@docker:/app$ python -m bonseyes_openpifpaf_wholebody.process.video \ --model /app/bonseyes_openpifpaf_wholebody/models/pytorch/shufflenetv2k30/v2.0_shufflenetv2k30_default_641x641_fp32.pkl \ --input-size 640x480 \ --engine pytorch \ --video-input /app/bonseyes_openpifpaf_wholebody/process/demo/samples/video/test/demo_video_1.mp4 \ --video-output /app/ \ --json-output /app/ \ --csv-output /app/ \ --logo \ --debug-info \ --device gpuProcessed
.mp4video is saved in file or directory, which is defined withvideo-outputCLI argument. Ifvideo-outputis path to directory where processed video needs to be saved, the name of the processed video is the same as the name of the input video withprocessed_prefix added to original image name. For example ifvideo-outputis path to directory and input video istest.mp4, processed video will be saved asprocessed_test.mp4in specified directory.
csvandjsonfiles with video predictions will be saved in files or directories, which are defined withcsv-outputandjson-outputCLI arguments. Ifjson-outputandcsv-outputare paths to directories, the name of the json and csv files is the same as the name of processed video. For example if input video istest.mp4, json file will be saved asprocessed_test.jsonin specified directory withjson-outputCLI argument and csv file will be saved asprocessed_test.csvin specified directory withcsv-outputCLI argument.Note
Video has to be in
.mp4format.Warning
If selected docker image does not have CUDA support, replace
--device gpuwith--device cpu
Camera Process
Camera-based processing records from your camera and infers the AI model on the frames during recording. When running /<bonseyes_aiasset_name>/process/camera.py script, the window with camera recording will be opened with algorithm predictions rendered in it. After recording is stopped (by pressing q), recorded rendered video after recording is saved to .mp4 file and output results are saved to .csv and .json files.
The camera processing script in
/<bonseyes_aiasset_name>/process/camera.pyis used to process an camera-based records. This script opens the window with camera recording, instantiates an Algorithm class to process and render the frames during recording and finally outputs to ajsonandcsvfiles.In this link you can find example of
camera.pyprocess camera script in Bonseyes Openpifpaf Wholebody.Here is the example of running
camera.pyscript:# user@docker:/app$ python -m bonseyes_openpifpaf_wholebody.process.camera \ --model /app/bonseyes_openpifpaf_wholebody/models/pytorch/shufflenetv2k30/v2.0_shufflenetv2k30_default_641x641_fp32.pkl \ --input-size 320x320 \ --engine pytorch \ --video-output /app/recording.mp4 \ --json-output /app/recording_predictions.json \ --csv-output /app/recording_predictions.csv \ --logo \ --debug-info \ --device gpuProcessed
.mp4video is saved in file defined withvideo-outputCLI argument.
csvandjsonfiles with video predictions will be saved in files, which are defined withcsv-outputandjson-outputCLI arguments.
HTTP Worker Process
With HTTP worker-based processing (server), the input is sent from a remote client to HTTP server, which processes the input and returns model predictions to the client.
HTTP worker-based processing script in
/<bonseyes_aiasset_name>/process/server.pytakes an input image or folder with images from the client, performs inference on them and returns predictionsto the client.In this link you can find example of
server.pyprocess HTTP worker script in Bonseyes Openpifpaf Wholebody.To run HTTP worker process you need to:
Run Docker container on host with specified ports. Example of running Docker container for Bonseyes YOLOX HTTP Worker process is following:
docker run --name bonseyes_openpifpaf_wholebody \
    --privileged --rm -it \
    --gpus 0 \
    --ipc=host \
    -p 8888:8888 \
    -v /tmp/.X11-unix:/tmp/.X11-unix \
    --device /dev/video0 \
    -e DISPLAY=$DISPLAY \
    registry.gitlab.com/bonseyes/artifacts/assets/bonseyes_openpifpaf_wholebody/x86_64:v3.0_cuda10.2_tensorrt7.
In executed container run
/<bonseyes_aiasset_name>/process/server.pyscript with specified model, inference engine, input shape, port and device as CLI arguments.Example of running
/<bonseyes_aiasset_name>/process/server.pyin container is following:# user@docker:/app$ python -m bonseyes_openpifpaf_wholebody.process.server \ --model /app/bonseyes_openpifpaf_wholebody/models/pytorch/shufflenetv2k30/v2.0_shufflenetv2k30_default_641x641_fp32.pkl \ --input-size 641x641 \ --engine pytorch \ --port 8888Send image or image folder from client to server to process them. Here are examples of sending request from client to server:
If you are sending request out of the container, run:
#user@host:/$
    curl --request POST \
        --data-binary @/path/to/image.jpg \
        http://localhost:<PORT>/inference
for example
#user@host:/$
curl --request POST \
    --data-binary @bonseyes_openpifpaf_wholebody/process/demo/samples/image/test/demo_image_1.jpg \
    http://localhost:8888/inference
After sending request to server (by running command above), image or folder with images is processed in server and string of jsonified predictions is returned to client.
LPDNN process
To process images, videos or camera steams with LPDNN, different arguments from those used for pytorch, tensorrt or, onnxruntime need to be passed to the processing scripts. The AI App config json file needs to be specified, which defines implicitly the underlying inference engine to used within LPDNN, i.e., lne, onnxruntime, ncnn or tensorrt.
Image process
The image-based process takes an input file and AI App config json file and infers the LPDNN engine on it.
The image processing script in
/<bonseyes_aiasset_name>/process/image.pyis used to process an input image. This script loads image or image folder, which needs to be in.jpgformat, executes LPDNN using HTTP Worker (instantiates LPDNNAlgorithm class) to process and render the image and finally outputs to a json file.In this link you can find example of
image.pyLPDNN process image script in Bonseyes 3DDFA.By running process image script you need to specify
--engineCLI argument to be ‘lpdnn’,--app-configpath to the aiapp-config.json file,--deployment-packagedepending on the platform and--porton which the http-worker is running.Here is the example of running
image.pyscript:python -m bonseyes_3ddfa_v2.process.image \ --engine lpdnn \ --app-config build/3dface-landmarks-v1.0-mobilenetv1-120x120/ai_app_config.json \ --deployment-package x86_64-ubuntu20_cuda \ --port 8889 \ --jpg-output /app/test.jpg \ --json-output /app/test.json \ --jpg-input /app/test.jpgProcessed
jpgimage is saved in file or directory, which is defined withjpg-outputCLI argument. Ifjbg-outputis path to directory where processed image needs to be saved, the name of the processed image is the same as the name of the input image withprocessed_prefix added to original image name. For example ifjpg-outputis path to directory and input image istraffic.jpg, processed image will be saved asprocessed_traffic.jpgin specified directory.
jsonfile with image predictions will be saved in file or directory, which is defined withjson-outputCLI argument. Ifjson-outputis path to directory where processed image needs to be saved, the name of the json file is the same as the name of processed image. For example ifjson-outputis path to directory and input image istraffic.jpg, json file will be saved asprocessed_traffic.jsonin specified directory withjson-outputCLI argument.Note
Image has to be in
.jpgformat.Warning
If selected docker image does not have CUDA support, replace
--device gpuwith--device cpu
Video Process
The video-based process takes a video and AI App config json file as inputs and infers the LPDNN engine on it.
The video processing script in
/<bonseyes_aiasset_name>/process/video.pyis used to process an input video. This script loads video file, which needs to be in.mp4format, executes LPDNN using HTTP Worker (instantiates LPDNNAlgorithm class) to process and render the video and finally outputs to ajsonandcsvfiles.In this link you can find example of
video.pyprocess video script in Bonseyes 3DDFA.By running process video script you need to specify
--engineCLI argument to be ‘lpdnn’,--app-configpath to the aiapp-config.json file,--deployment-packagedepending on the platform and--porton which the http-worker is running.Here is the example of running
video.pyscript:python -m bonseyes_3ddfa_v2.process.video \ --engine lpdnn \ --app-config build/3dface-landmarks-v1.0-mobilenetv1-120x120/ai_app_config.json \ --deployment-package x86_64-ubuntu20_cuda \ --port 8889 \ --video-input /app/demo_video_1.mp4 \ --video-output /app/prediction.mp4 \ --json-output /app/prediction.json \ --csv-output /app/prediction.csvProcessed
.mp4video is saved in file or directory, which is defined withvideo-outputCLI argument. Ifvideo-outputis path to directory where processed video needs to be saved, the name of the processed video is the same as the name of the input video withprocessed_prefix added to original image name. For example ifvideo-outputis path to directory and input video istest.mp4, processed video will be saved asprocessed_test.mp4in specified directory.
csvandjsonfiles with video predictions will be saved in files or directories, which are defined withcsv-outputandjson-outputCLI arguments. Ifjson-outputandcsv-outputare paths to directories, the name of the json and csv files is the same as the name of processed video. For example if input video istest.mp4, json file will be saved asprocessed_test.jsonin specified directory withjson-outputCLI argument and csv file will be saved asprocessed_test.csvin specified directory withcsv-outputCLI argument.Note
Video has to be in
.mp4format.Warning
If selected docker image does not have CUDA support, replace
--device gpuwith--device cpu
Camera Process
Camera-based processing records from your camera and infers the LPDNN engine on the frames during recording. When running /<bonseyes_aiasset_name>/process/camera.py script, the window with camera recording will be opened with LPDNNAlgorithm predictions rendered in it. After recording is stopped (by pressing q), recorded rendered video after recording is saved to .mp4 file and output results are saved to .csv and .json files.
The camera processing script in
/<bonseyes_aiasset_name>/process/camera.pyis used to process an camera-based records. This script opens the window with camera recording, executes LPDNN using HTTP Worker (instantiates LPDNNAlgorithm class) to process and render the frames during recording and finally outputs to ajsonandcsvfiles.In this link you can find example of
camera.pyprocess camera script in Bonseyes 3DDFA.By running process camera script you need to specify
--engineCLI argument to be ‘lpdnn’,--app-configpath to the aiapp-config.json file,--deployment-packagedepending on the platform and--porton which the http-worker is running.Here is the example of running
camera.pyscript:python -m bonseyes_3ddfa_v2.process.camera \ --engine lpdnn \ --app-config build/3dface-landmarks-v1.0-mobilenetv1-120x120/ai_app_config.json \ --deployment-package x86_64-ubuntu20_cuda \ --port 8889 \ --video-output /app/prediction.mp4 \ --json-output /app/prediction.json \ --csv-output /app/prediction.csvProcessed
.mp4video is saved in file defined withvideo-outputCLI argument.
csvandjsonfiles with video predictions will be saved in files, which are defined withcsv-outputandjson-outputCLI arguments.
Warning
- Potential process issues and fixes:
If you cannot run demo camera in your container, make sure that you have added
--device /dev/video0in docker run command to acces camera.Possible issue with running camera in your container can be that you don’t have permission to /dev/ folder. In order to fix it run
sudo chown -R user:user /dev/video0in container, which enables access to camera.If you have problem with sending request to server, check docker container port and make sure that you use the same port in curl request.
Make sure that input image used in
/<bonseyes_aiasset_name>/process/image.pyand image sent to server is in.jpgformat and video used in/<bonseyes_aiasset_name>/process/video.pyis in.mp4format.When root user in container, there is problem with permissions of mounted files/ directories/ devices. That created problems when running camera on Jetson Nano board (problematic connection of xserver so that app can display window with rendered output) and you got the error.
No protocol specified
Unable to init server: Could not connect: Connection refused
then you should execute
xhost local:rooton board outside the docker container.
VIII. Benchmark
Bonseyes AI Assets provide benchmark tools for Pytorch, ONNX, TensorRT (and potentially torch2trt) inference engines evaluation on multiple input sizes. Benchmark tool is running /<bonseyes_aiasset_name>/algorithm/algorithm.py for specified inference engine on evaluation dataset and then calculates statistics. Accuracy results with calculated preprocessing, inference and postprocessing time, latency, model statistics and hardware statistics (CPU and GPU memory and temperature, power consumption and energy efficiency) are stored in csv and json files.
Hardware statistics are calculated using /<bonseyes_aiasset_name>/utils/meter.py which can be also found in AI Asset Container Generator.
Also we provide tool for graph generation based on benchmark results (csv file) which will be stored in .jpg graphic.
Bonseyes AI Asset benchmark tools you can find in AI Asset Container Generator.
Also, examples of benchmark code in Bonseyes Openpifpaf Wholebody AI Asset you can find in this link.
Models benchmark
Implement Bonseyes benchmark script in
/<bonseyes_aiasset_name>/benchmark/__main__.pywhich instantiatesAlgorithmclass for certain inference engine and runsbenchmarkfunction.benchmarkfunction is running model evaluation on validation dataset and computes hardware and accuracy statistics which need to be stored inresultsdictionary which is the output of this function. Implementbenchmarkfunction in this script:
Apply Algorithm process on every image from dataloader (load images from validation dataset)
Calculate average preprocessing, inference, postprocessing and processing time
Calculate accuracy statistics (for example AP, APM, APL, AR, ARM, ARL) and evaluation time and add them to
accuracy_statsdictionaryCalculate model statistics from
/<bonseyes_aiasset_name>/benchmark/model_summary.pyand addGFLOPsand#PARAMStoresultdictionaryCalculate hardware statistics from
HardwareStatusMeterclass from/<bonseyes_aiasset_name>/utils/meter.pyStore all calculations in
result,hw_statsandaccuracy_statsdictionariesMerge
result,hw_statsandaccuracy_statsdictionaries in one dictionary and return it as function outputIn this link you can find example of
/<bonseyes_aiasset_name>/benchmark/__main__.pyin Bonseyes Openpifpaf Wholebody AI Asset.Here is the example of running
/<bonseyes_aiasset_name>/benchmark/__main__.pyscript in Bonseyes Openpifpaf Wholebody AI Asset:python -m bonseyes_openpifpaf_wholebody.benchmark \ --model /app/bonseyes_openpifpaf_wholebody/models/pytorch/shufflenetv2k30/v3.0_shufflenetv2k30_default_641x641_fp32.pkl \ --engine pytorch \ --input-size 641x641 \ --preprocess-with torchvision \ --force-complete-pose \ --seed-threshold 0.2Benchmark results (
result.csvandresult.json) should be saved in directory specified withresult-directoryCLI argument.Use
/<bonseyes_aiasset_name>/benchmark/all.pyto benchmark Pytorch, ONNX, TensorRT (and potentially torch2trt inference engine) or all engines with different precisions (fp32, fp16 and int8). The benchmark results will be stored inresult.jsonandresult.csvfiles. Specify possible backbone names as options in backbone CLI argument and dataset path inmain()of this script.In this link you can find example of
/<bonseyes_aiasset_name>/benchmark/all.pyin Bonseyes Openpifpaf Wholebody AI Asset.Here is the example of running
/<bonseyes_aiasset_name>/benchmark/all.pyscript in Bonseyes Openpifpaf Wholebody AI Asset:python -m bonseyes_openpifpaf_wholebody.benchmark.all \ --input-sizes 28x72 256x192 512x512 \ --device gpu \ --backbone shufflenetv2k30 \ --dataset wholebody
LPDNN benchmark
Benchmark tool is running LPDNNAlgorithm class on specified LPDNN inference engine on evaluation dataset and then calculates statistics.
In this link you can find example of running the benchmark with LPDNN engine in 3DDFA:
python -m bonseyes_3ddfa_v2.benchmark.evaluate \
   --dataset aflw2000-3d \
   --engine lpdnn \
   --app-config build/3dface-landmarks-v1.0-mobilenetv1-120x120/ai_app_config.json \
   --deployment-package x86_64-ubuntu20_cuda \
   --port 8889 \
   --input-size 120 \
   --model build/3dface-landmarks-v1.0-mobilenetv1-120x120/model.onnx
In this link you can find example of running benchmark.all script in 3DDFA:
python -m bonseyes_3ddfa_v2.benchmark.all \
   --dataset aflw2000-3d \
   --engine all \
   --input-sizes 120 \
   --app-config build/3dface-landmarks-v1.0-mobilenetv1-120x120/ai_app_config.json \
   --deployment-package x86_64-ubuntu20_cuda \
   --port 8889
Generate graphs
Use Bonseyes AI Asset plot tool in /<bonseyes_aiasset_name>/benchmark/generate_graphs.py to generate graphs from benchmark csv results. This function takes csv file specified with csv-path CLI argument as input and generates storage, accuracy, performance and resource consumption graphs. This graph will be saved in directory specified with output-path CLI argument with graph.jpg name.
In this link you can find /<bonseyes_aiasset_name>/benchmark/generate_graphs.py in AI Asset Container Generator.
You can also find the example of /<bonseyes_aiasset_name>/benchmark/generate_graphs.py script in Bonseyes Openpifpaf Wholebody AI Asset.
Here is the example of running /<bonseyes_aiasset_name>/benchmark/generate_graphs.py script in Bonseyes Openpifpaf Wholebody AI Asset:
python -m bonseyes_openpifpaf_wholebody.benchmark.generate_graphs \
    --csv-path /app/result.csv \
    --output-path /app/
Warning
- Potential benchmark issues and fixes:
If you are running benchmark in container on Jetson device and hardware statistics are all 0, make sure that you have mount
/run/jtop.sockwhen running your container. So, in docker run command for running container with jetpack image-v /run/jtop.sock:/run/jtop.sockneeds to be added
IX. Utils
Bonseyes AI Assets provide tools for calculating hardware and environment information (GPU and CPU memory, power, model storage, GPU and CPU temperature, environment, code version, git branch and git commit hash).
<bonseyes_aiasset_name>/utils package contains following scripts:
environment_info
gstreamer_pipelines
hardware_info
meter
All utils scripts mentioned above can be found in AI Asset Container Generator.
In this link can be found utils scripts in Bonseyes Openpifpaf Wholebody AI Asset.
environment_info
This script gives contains EnvironmentInformation class which collects following information:
system libraries information - cmake, gcc, cuda and python versions
python libraries information - gets python package versions (for example onnx, onnxruntime, numpy, scipy, cython, pandas, torch, torchvision, numba)
code version - gets git branch and commit hash
This script is imported in <bonseyes_aiasset_name>/benchmark/generate_graphs.py script and it is written in the beginning of the graph jpg file.
Here is the link of ``<bonseyes_aiasset_name>/utils/environment_info.py script in Bonseyes Openpifpaf Wholebody AI Asset.
gstreamer_pipelines
<bonseyes_aiasset_name>/utils/gstreamer_pipelines.py script contains commands for capturing and sincing video frames for all x86_64, NVIDIA Jetson devices and RaspberryPi.
It is imported and used in <bonseyes_aiasset_name>/process/video.py and <bonseyes_aiasset_name>/process/camera.py scripts.
Here is the example of this script in Bonseyes Openpifpaf Wholebody AI Asset.
meter
<bonseyes_aiasset_name>/utils/meter.py contains HardwareStatusMeter class, which is used to calculate hardware statistics on GPU and CPU during execution on x86_64, Jetson devices or RaspberryPi4. This class detects environment and collects GPU and CPU memory, power, model storage, GPU and CPU temperature.
This script is used in <bonseyes_aiasset_name>/utils/hardware_info.py and is also used in <bonseyes_aiasset_name>/benchmark/__main__.py script which uses hardware information and stores it to csv file.
Here is the link of the <bonseyes_aiasset_name>/utils/meter.py script in Bonseyes Openpifpaf Wholebody AI Asset.
hardware_info
<bonseyes_aiasset_name>/utils/hardware_info.py contains Hardware Information class which initializes HardwareStatusMeter class from meter.py script and calculates following informations:
GPU information - GPU model name, GPU number, drive rversion and CUDA version
CPU information - CPU architecture, model name, vendor and CPU number
memory information
This script is used in <bonseyes_aiasset_name>/benchmark/generate_graphs.py where collected informations are written at the beginning of the graph.
Here is the link of the <bonseyes_aiasset_name>/utils/hardware_info.py script in Bonseyes Openpifpaf Wholebody AI Asset.
X. Testing
Implement automatic tests for all interfaces in /interface/tests/ scripts.
Interface scripts are used to call <bonseyes_aiasset_name> modules and they are executed during testing and running AI Asset CLI.
Implement and use
/interface/exporter.pyscript, which executes<bonseyes_aiasset_name>.export.allwith specified CLI argumentsImplement and use
/interface/optimizer.pyscript, which executes<bonseyes_aiasset_name>.optimize.post_training_quantization.allwith specified CLI argumentsImplement and use
/interface/image_processor.pyscript, which executes<bonseyes_aiasset_name>.process.imagewith specified CLI argumentsImplement and use
/interface/video_processor.pyscript, which executes<bonseyes_aiasset_name>.process.videowith specified CLI argumentsImplement and use
/interface/camera_processor.pyscript, which executes<bonseyes_aiasset_name>.process.camerawith specified CLI argumentsImplement and use
/interface/server.pyscript, which executes<bonseyes_aiasset_name>.process.serverwith specified CLI argumentsImplement and use
/interface/benchmark.pyscript which, executes<bonseyes_aiasset_name>.benchmark.allwith specified CLI argumentsImplement and use
/interface/trainer.pyscript, which executes<bonseyes_aiasset_name>.trainwith specified CLI arguments and training and validation datasetAdd test image in
/interface/tests/samples/image/directory, which will be used while executing process image in test scriptAdd test video in
/interface/tests/samples/video/directory, which will be used while executing process video in test script
Note
Note that /interface/camera_processor.py, /interface/server.py and /interface/trainer.py are not executed in
tests. They are only executed using AI Asset CLI.
/interface/tests/ scripts are executing interface scripts on GPU or CPU (export, optimize, process image, process video and benchmark). Interface scripts are executed on different engines and different precisions. Tests on CPU can only be executed with Pytorch and ONNX models, while tests on GPU can be executed with Pytorch, ONNX and TensorRT models.
Implement CPU test cases in
/interface/tests/test_interface_cpu.py.Implement GPU test cases in
/interface/tests/test_interface_gpu.py
You can run tests on GPU in your container by executing pytest -k gpu command in container.
Tests on CPU in container can be run by executing pytest -k cpu command in container.
Uncomment test stage in .gitlab-ci.yml file when all /interface/ and /interface/tests/ scripts are implemented
Warning
- Potential test issues and fixes:
TensorRT requires CUDA, so you can’t run TensorRT export, optimize and benchmark on TensorRT models on CPU (those commands mustn’t be added in
/interface/tests/test_interface_cpu.pyscript)
XI. AI Asset CLI Integration
AI Asset CLI runs /interface/ scripts explained in Testing section. Interface scripts, which are used in CLI and not used in test scripts, are /interface/camera_processor.py, /interface/server.py and /interface/trainer.py
XII. Documentation
Use Bonseyes documentation template stored in /doc to explain all implemented components.
Store demo image, video and benchmark results in following directories:
Store demo images and processed demo images in
/doc/examples/example_images/directoryStore demo video and processed demo video in
/doc/examples/example_videos/directoryStore
benchmark.csv,benchmark.jsonandgraph.jpgin:/doc/eval_results/Server/directory for server benchmark results/doc/eval_results/NVIDIA-Jetson-AGXdirectory for JetsonXavier AGX benchmark results/doc/eval_results/NVIDIA-Jetson-NXdirectory for JetsonXavier NX benchmark results
Implement following .rst scripts:
Implement and use
/doc/paper.rstto add Official repository’s paper reference, abstract and links to official git repository, git branch and commit used in source of AI AssetImplement and use
/doc/usage.rstand add following sections:Installation - add docker pull and docker run commands for all platforms
Data - add paths to data or execution commands for automatic download data
Export - add
export.allexecution on CPU and GPUOptimize - add
post_training_quantization.allexecution on CPU and GPU and suggested input sizesProcess - add
process.imageexecution, add processed image and predictions fromjsonfile. For video addprocess.videoexecution command and add processed video gif from/doc/examples/examples_videos/directory. For camera addprocess.cameraexecution commandBenchmark - add single model benchmark and benchmark all execution command and copy json file with results for single model benchmark.
Implement and use
/doc/install.rstand add Bonseyes AI Asset installation for target device. In Workstation/Server (x86_64), NVIDIA Jetson devices, RaspberryPi4 devices sections add:System Requirements
Docker section - profiles for certain devices, docker build and docker run container commands and AI Asset setup in Dockerfile
Implement and use
/doc/models.rstand add paths to pretrained Pytorch models and their model summaries on multiple input sizesImplement and use
/doc/train.rstand add section for train and validation dataset and section for executing training with CLIImplement and use
/doc/optimize.rstand add section for validation data and sections for executing ONNX, TensorRT quantization and quantization of all inference enginesImplement and use
doc/export.rstand add sections for executing/<bonseyes_aiasset_name>/export/torch2onnx.py,/<bonseyes_aiasset_name>/export/onnx2trt.pyand/<bonseyes_aiasset_name>/export/all.pyscriptsImplement and use
doc/process.rstand add sections for executing/<bonseyes_aiasset_name>/process/image.py,/<bonseyes_aiasset_name>/process/video.py,/<bonseyes_aiasset_name>/process/camera.pyand/<bonseyes_aiasset_name>/process/server.pyscriptsImplement and use
doc/eval.rstand add sections:Reproduce Published Results - add path where data is stored or how to execute automatic data download script and add execution command for running eval script of Official code if it exists. Copy evaluation result in this section
Single Model Benchmark - executing
<bonseyes_aiasset_name>.benchmarkand copy evaluation result in this sectionBenchmark of All Models - executing
<bonseyes_aiasset_name>.benchmark.allSample Processed Images - add sample demo images and processed demo images
Implement and use
doc/benchmark.rstand uploadbenchmark.csvandgraph.jpgfiles from examples folder forx86_64,NVIDIA Jetson Xavier AGX,NVIDIA Jetson Xavier NXandRaspberryPi4
You can update documenation by running:
cd doc
rm -rf _build && make html
To view rendered HTML docs open /doc/_build/html/index.html
Warning
- Potential documentation issues and fixes:
If there is error called
No module namedfor some library, add the library name toautodoc_mock_importslist in/doc/conf.py